Introduction: When Waste Becomes Worth
There is something deeply satisfying about taking something that most people would throw away—and turning it into something beautiful, useful, and even admired.
Plastic bottles are everywhere. You see them daily, use them without thinking, and discard them just as quickly. They represent convenience, but also waste. And for most people, their story ends in the trash.
But not for everyone.
Some people look at a plastic bottle and see structure.
Others see potential.
And a few—those who think differently—see furniture.
The viral upcycled plastic bottle footstool ottoman is more than just a DIY trend. It is a statement. It represents creativity, sustainability, and the power of perception. It shows how something ordinary can be transformed into something meaningful—and even stylish.
In this article, you will go far beyond simple instructions. You will learn:
- The deeper design principles behind this project
- The structural logic that makes it actually functional (not just decorative)
- How to customize it to your personality and space
- The psychological reason why this idea is spreading so fast
- And how you can use this kind of creativity in your own life (even beyond DIY)
This is not just about making an ottoman.
This is about changing how you see value.
The Rise of Upcycling: Why This Idea Is Taking Over Social Media
Before we dive into the “how,” let’s understand the “why.”
Why are millions of people suddenly interested in turning trash into furniture?
1. Environmental Awareness Meets Creativity
People are becoming more conscious of:
- Plastic waste
- Environmental impact
- Sustainable living
But instead of just feeling guilty, they want action.
👉 Upcycling gives them control.
2. The Satisfaction of Transformation
There is a powerful emotional reward in transformation:
- Before → useless
- After → beautiful
Your brain loves this contrast. It feels like progress. Like achievement.
3. Accessibility
Unlike expensive decor:
- Anyone can do this
- Materials are cheap or free
- No advanced skills required
👉 This makes it viral.
4. Identity and Expression
People don’t just want a home.
They want a space that reflects:
- Their personality
- Their values
- Their creativity
This ottoman becomes a signature piece.
Understanding the Structure: Why This Ottoman Actually Works
This is important. Many DIY projects look good but are not functional.
This one works because of structural logic.
1. The Strength of Cylinders
Plastic bottles are not weak.
Their cylindrical shape makes them:
- Resistant to compression
- Able to support weight
👉 This is basic physics: cylinders distribute pressure evenly.
2. Collective Stability
One bottle alone = unstable
20–30 bottles together = strong structure
When tightly packed:
- They support each other
- Movement is minimized
- Weight is distributed
👉 This is called load distribution
3. The Role of Tape
Tape is not just holding—it is:
- Binding the structure
- Preventing shifting
- Creating a single solid unit
4. The Top Base (Cardboard or Wood)
This layer:
- Distributes weight evenly
- Prevents pressure points
- Creates a stable sitting surface
5. Cushion Foam
Adds:
- Comfort
- Softness
- Usability
Without it → hard surface
With it → real furniture
Materials: Choosing Smart, Not Just Easy
Let’s break down each material so you understand its role deeply.
Plastic Bottles
- Same size preferred
- Clean and dry
👉 Consistency = stability
Strong Adhesive Tape
Use:
- Packing tape
- Duct tape
👉 Weak tape = unstable structure
Cardboard vs Plywood
| Material | Advantage |
|---|---|
| Cardboard | Lightweight, easy |
| Plywood | Strong, durable |
👉 If you want long-term use → choose plywood
Foam Cushion
Thickness matters.
- Thin foam → decorative
- Thick foam → comfortable
Fabric
This defines your style.
- Neutral → calm
- Bold → expressive
- Textured → rich feeling
Step-by-Step Process (With Real Understanding)
Step 1: Preparing Bottles
Remove:
- Labels
- Moisture
👉 Clean materials = better bonding
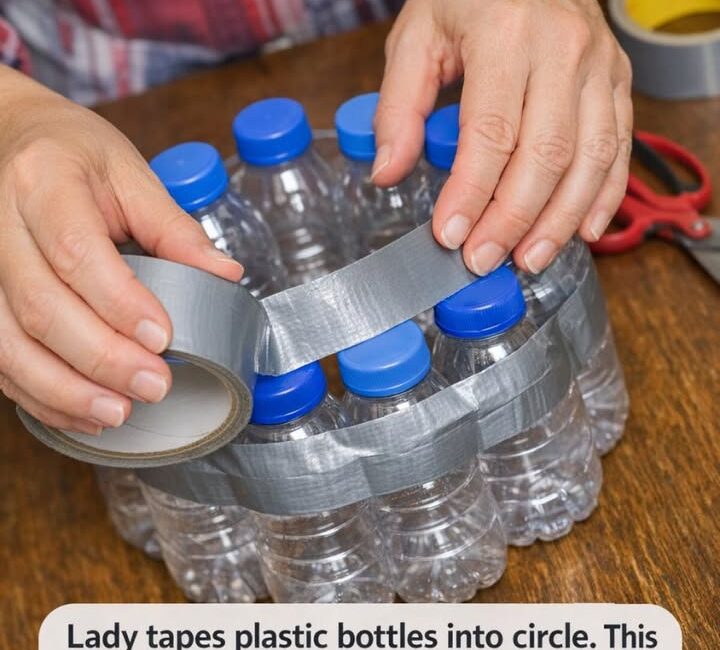
Step 2: Creating the Circle
Arrange bottles tightly.
💡 Important:
No gaps.
👉 Gaps = instability
Step 3: Securing with Tape
Click page 2 to continue