Leverage a simple laundry basket to create an innovative, space-saving, and cost-effective container garden. Whether you’re short on backyard space, live in an apartment with just a balcony, or want a portable gardening solution, repurposing a laundry basket can transform your urban jungle into a thriving veggie haven. In this comprehensive guide (around 3000 words), we’ll explore everything you need to know—from selecting the perfect basket and preparing the planting medium to sowing, nurturing, and harvesting six popular vegetables: potatoes, tomatoes, onions, lettuce, cucumbers, and peppers.
Table of Contents
- Why Choose a Laundry Basket Garden?
- Materials and Preparation
- Choosing the Right Basket
- Preparing Drainage
- Ideal Growing Medium
- Setting Up Your Laundry Basket Planter
- Crop Profiles and Planting Techniques
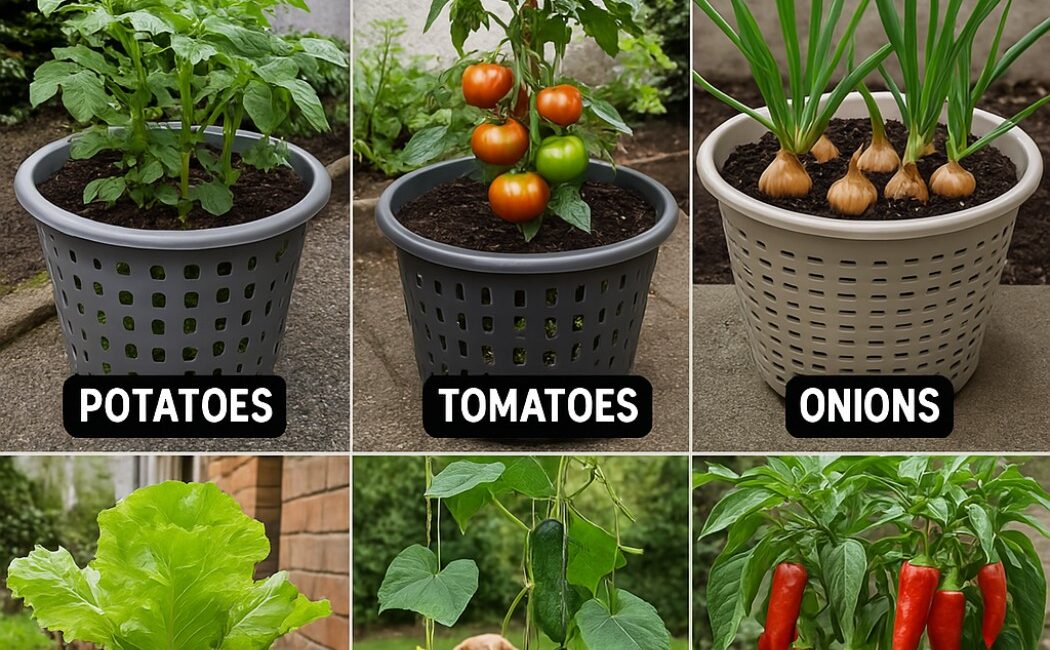
- Potatoes: Underground Treasures
- Tomatoes: Juicy and Upright
- Onions: Close-Quarter Champions
- Lettuce: Crisp and Quick
- Cucumbers: Vertical Vines
- Peppers: Sun-Loving Pods
- Watering, Feeding, and Maintenance
- Irrigation Strategies
- Fertilization Schedule
- Pruning and Training
- Pest and Disease Management
- Common Pests
- Preventative Measures
- Organic Remedies
- Harvesting and Post-Harvest Care
- Seasonal Considerations and Successive Cropping
- Advanced Tips and Tricks
- Frequently Asked Questions
- Conclusion: Embrace the Laundry Basket Revolution
1. Why Choose a Laundry Basket Garden?
Space Efficiency: Laundry baskets fit easily on balconies, patios, rooftops, or even indoors near a sunny window. Their vertical walls maximize growing volume, allowing you to produce a significant harvest from a compact footprint.
Cost-Effective: Reuse an existing laundry basket for ZERO additional cost. Even if you purchase a new basket, it’s far cheaper than traditional garden containers.
Portability: Because baskets are lightweight (especially when empty) and often have built-in handles, you can move your garden to chase the sun, protect from storms, or relocate for aesthetic or practical reasons.
Drainage and Aeration: The typical perforated design of laundry baskets encourages excellent drainage and airflow around roots, reducing waterlogging and root rot risks.
Fun & Aesthetic Appeal: Laundry basket planters add a quirky, creative touch to any space—friends will be asking for your secret!
2. Materials and Preparation
Choosing the Right Basket
- Material: Durable plastic baskets are ideal. Avoid flimsy thin plastic that may crack under weight of soil and water. UV-resistant materials will last longer outdoors.
- Size: Aim for 15–18 inches in diameter and 12–16 inches in depth. Larger baskets give more root room. For potatoes, opt for deeper (16–18 inches) models.
- Shape: Round or oval baskets promote even root spread. Rectangular ones work too but may require more soil.
- Handles: Ensure sturdy handles for easier movement when the basket is empty or partially filled.
Preparing Drainage
- Inspect for Perforations: Most laundry baskets have holes on sides and bottom—check they’re open and unobstructed.
- Additional Drainage: If holes are too small, drill or punch additional ¼–½” holes at the bottom to prevent pooling.
- Filter Layer (optional): Line the base with coconut coir mat or landscape fabric to hold soil in while allowing excess water to escape. This prevents soil loss and keeps drainage consistent.
Ideal Growing Medium
A lightweight, well-draining potting mix is essential. Avoid garden soil—too dense and prone to compaction.
Recommended Mix:
- 40% high-quality potting soil
- 30% coconut coir or peat moss
- 20% perlite or coarse vermiculite
- 10% compost (homemade or store-bought)
pH Balance: Aim for 6.0–7.0. Most veggies, including tomatoes and peppers, thrive in this range.
Nutrient Boosters: Mix in a slow-release organic fertilizer (e.g., 14-14-14 NPK) following manufacturer’s rates.
3. Setting Up Your Laundry Basket Planter
- Clean the Basket: Wash with mild soap and rinse thoroughly to remove residues.
- Position the Basket: Choose a sunny location—at least 6–8 hours of direct sunlight daily for tomatoes, peppers, and cucumbers. Shadier spots can accommodate lettuce and onions.
- Install a Bottom Layer: Place crushed charcoal or small stones (1–2 inches) to improve drainage if your basket has large openings. Cover with filter fabric.
- Fill with Potting Mix: Pour prepared medium into basket, leaving 2–3 inches from the rim for easy watering.
- Plan for Growth: For tall crops like tomatoes and cucumbers, insert stakes, cages, or a mini trellis at this stage to avoid disturbing roots later.
4. Crop Profiles and Planting Techniques
4.1 Potatoes: Underground Treasures
Varieties: Yukon Gold, Red Pontiac, Fingerlings.
Planting Depth:
- Start with 3–4 inches of soil, place seed potatoes (2–3 eyes per piece), cover with 3–4 inches of mix.
- As shoots emerge, mound more soil around stems (hilling) until you reach the rim.
Spacing:
- 3–4 potatoes per 16 inch basket.
Watering:
- Keep soil evenly moist but not waterlogged.
Fertilizing:
- Side-dress with compost tea every 3–4 weeks.
Harvest:
- New potatoes in 10–12 weeks when plants flower. Full harvest after foliage dies back (~16 weeks).
4.2 Tomatoes: Juicy and Upright
Varieties: Cherry, Roma, Beefsteak (choose determinate or compact indeterminate varieties).
Planting Depth:
- Bury two-thirds of the stem to encourage robust root systems.
Support:
- Use a 5–6 ft cage or sturdy stake. Tie stems loosely with garden twine.
Spacing:
- One main plant per basket for large types; 2–3 for compact or cherry varieties.
Watering:
- Deep, infrequent watering to encourage strong roots—about 1–2 inches per week.
Feeding:
- Balanced fertilizer (5-10-10 NPK) at fruit set, then monthly thereafter.
Pruning:
- Remove suckers on indeterminate varieties to focus energy on main stems and fruit.
Harvest:
- Pick when fruit are fully colored and slightly soft to the touch.
4.3 Onions: Close-Quarter Champions
Varieties: Sweet onions, red onions, green bunching onions.
Planting:
- Direct sow onion sets (small bulbs) about 1 inch deep, 2–3 inches apart.
- Alternatively, transplant seedlings at similar spacing.
Watering:
- Consistent moisture for bulb formation; about 1 inch per week.
Fertilizing:
- High nitrogen feed early (12-6-6) to encourage leaf growth; switch to balanced as bulbs swell.
Harvest:
- Green onions can be harvested at any stage; mature bulbs in 12–16 weeks when tops yellow and fall over.
4.4 Lettuce: Crisp and Quick
Varieties: Leaf lettuce (Red Sails), Butterhead, Romaine.
Planting:
- Sow seeds thinly on the surface, press gently into the soil, cover lightly with ¼ inch of mix.
Spacing:
Click page 2 for more