There’s something magical about the aroma of freshly baked bread filling your kitchen. The warm, comforting scent of yeast, the golden crust crackling as it cools, and that first slice slathered with butter — it’s one of life’s simplest and most satisfying pleasures. Many people believe that baking bread from scratch is difficult or time-consuming, something best left to professional bakers. But the truth is, anyone — yes, anyone — can make homemade bread with just four basic ingredients. No fancy equipment. No complicated steps. Just simplicity, flavor, and joy.
In this detailed guide, we’ll explore how you can create a perfect loaf of homemade bread using only flour, water, yeast, and salt. You’ll learn not only the step-by-step method but also the science behind bread-making, how to troubleshoot common issues, how to adapt your bread for different dietary preferences, and even creative ways to serve it.
So, preheat your oven, roll up your sleeves, and get ready to experience one of the most rewarding kitchen skills you can ever learn.
Why Homemade Bread Is Worth It
Before we dive into the process, let’s talk about why baking bread at home is worth your time. In today’s fast-paced world, we’re surrounded by convenience foods — pre-packaged loaves with long ingredient lists filled with preservatives, emulsifiers, and stabilizers. Homemade bread, by contrast, gives you complete control over what goes into your food. You know exactly what you’re feeding your family, and you can savor the taste of something made entirely with your hands.
Healthier Ingredients
Store-bought bread often contains additives to increase shelf life and improve texture. But with just four natural ingredients, you can make bread that’s fresh, wholesome, and free of unnecessary chemicals. This simplicity is what makes homemade bread healthier and more digestible.
Cost-Effective and Sustainable
Making bread at home costs a fraction of what you pay for artisanal loaves at the bakery. Flour, yeast, salt, and water are some of the most inexpensive ingredients in your pantry. Plus, baking at home reduces packaging waste — a small yet impactful step toward sustainability.
Therapeutic and Rewarding
Kneading dough, watching it rise, and pulling a golden loaf from the oven is a deeply satisfying process. Many people describe bread baking as meditative — a mindful practice that connects you to centuries of tradition. You can literally taste the effort and love you put into every loaf.
The Four Essential Ingredients
You don’t need anything fancy to bake incredible bread. These four ingredients, in the right balance, create magic.
1. Flour – The Foundation
Flour provides structure and texture to your bread. When mixed with water, it forms gluten — a network of proteins that trap air bubbles and give bread its chewy, elastic texture.
- Best Choice: Bread flour is ideal because it contains higher protein content (around 12–14%), which enhances gluten development.
- Alternative Options: All-purpose flour works fine for beginners. If you’re looking for a slightly denser, more rustic loaf, try mixing in whole wheat flour.
2. Water – The Catalyst
Water activates the yeast and binds with flour to form dough. The temperature of the water is crucial — too hot, and it kills the yeast; too cold, and the yeast stays dormant.
- Ideal Temperature: Around 100–110°F (37–43°C) is perfect for activating yeast.
- Filtered or Tap: Use filtered water if your tap water contains a lot of chlorine, as it can inhibit yeast growth.
3. Yeast – The Rising Power
Yeast is the living organism responsible for fermentation. It consumes the sugars in flour, releasing carbon dioxide that makes your bread rise.
- Active Dry Yeast: Must be dissolved in warm water before use.
- Instant Yeast: Can be mixed directly with the flour.
- Tip: Store yeast in a cool, dry place or the refrigerator to maintain its potency.
4. Salt – The Flavor Enhancer
Salt not only adds flavor but also strengthens the gluten structure and controls yeast activity. Without salt, bread tastes flat and rises too quickly, leading to poor texture.
- Use Fine Sea Salt or Kosher Salt: Avoid table salt with added iodine or anti-caking agents for best results.
The Simplest Recipe: 4-Ingredient Homemade Bread
Let’s get straight to the star of this article — the recipe that proves anyone can make bakery-quality bread at home.
Ingredients:
- 3 cups (360g) bread flour
- 1 ½ teaspoons salt
- ½ teaspoon active dry yeast
- 1 ½ cups (360ml) warm water
That’s it — no oil, no sugar, no milk, no eggs. Just the essentials.
Step-by-Step Instructions
Step 1: Mixing the Dough
In a large mixing bowl, combine the flour, salt, and yeast. Stir them together with a spoon or your hands to distribute evenly. Pour in the warm water and mix until a rough, sticky dough forms.
- Don’t overthink it — this stage is all about bringing the ingredients together.
- If the dough seems too dry, add a tablespoon of water at a time.
- If it’s too wet, sprinkle in a bit more flour.
The dough should look shaggy and sticky — this is normal.
Step 2: First Rise (Fermentation)
Cover the bowl with plastic wrap or a damp towel and let the dough rest at room temperature for 12–18 hours.
This long fermentation allows the yeast to develop deep, complex flavors and create beautiful air pockets. It’s what gives your bread that artisan-style texture without any kneading.
During this time, you’ll see the dough expand, bubble, and loosen in texture. That’s a sign that the yeast is working perfectly.
Step 3: Shaping the Dough
Once the dough has doubled in size and is covered with bubbles, gently turn it onto a lightly floured surface. Use a spatula or scraper — it will be sticky!
With floured hands, fold the dough over itself a few times to create surface tension. Shape it into a round or oval loaf.
Let the dough rest for another 30–45 minutes while you preheat your oven.
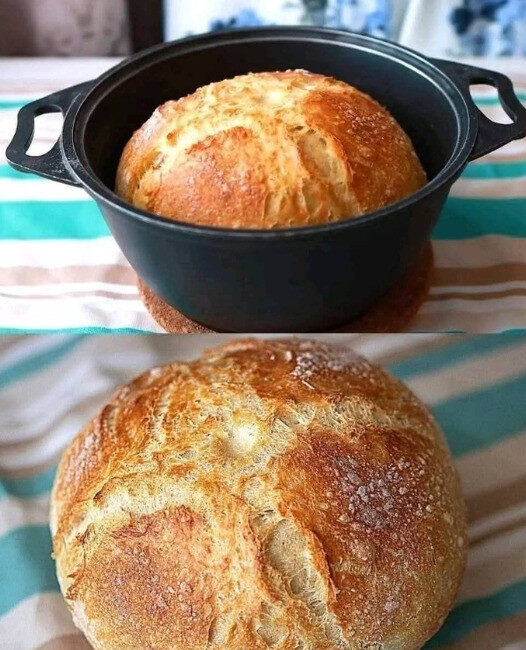
Step 4: Preheating the Oven and Baking Vessel
Preheat your oven to 450°F (230°C) and place a heavy Dutch oven (with lid) inside while it heats. The preheated pot creates steam that gives your bread its signature crispy crust.
If you don’t have a Dutch oven, use a baking stone or sheet and a small oven-safe pan filled with water to create steam.
Step 5: Baking the Bread
Once the oven is ready, carefully transfer the dough into the hot Dutch oven (use parchment paper if desired). Cover with the lid and bake for 30 minutes.
After 30 minutes, remove the lid and bake uncovered for another 10–15 minutes, until the crust turns deep golden brown.
Step 6: Cooling and Slicing
Remove the bread from the pot and let it cool on a wire rack for at least 1 hour. This step is crucial — it allows the interior to set and moisture to distribute evenly.
When you finally slice into your loaf, you’ll find a tender crumb, a beautifully crisp crust, and an aroma that fills the room.
Understanding the Science Behind Bread
Baking bread isn’t just a recipe — it’s chemistry in action. Understanding how each element interacts helps you improve with every loaf.
1. Gluten Formation
When flour mixes with water, gluten proteins form long, stretchy strands. These strands trap gas from yeast fermentation, creating rise and structure.
2. Yeast Fermentation
Yeast converts natural sugars from the flour into carbon dioxide and ethanol. The gas expands the dough, while the alcohol evaporates during baking, leaving behind rich flavor.
3. Oven Spring
During the first few minutes of baking, heat activates the yeast one last time, causing rapid expansion — known as “oven spring.” Steam and trapped gases push the dough upward, forming that irresistible bakery-style dome.
4. The Crust
Steam inside the oven keeps the dough moist long enough for expansion, then dissipates, allowing the surface to caramelize and crisp. The golden-brown crust is a product of the Maillard reaction, which adds depth and aroma.
Common Mistakes and How to Fix Them
Click page 2 for more