There’s something almost magical about caramel — that golden, glossy richness that coats spoons, drips over desserts, and turns even the simplest treats into something extraordinary. It’s sweet, buttery, and nostalgic — a flavor that feels like warmth itself.
But here’s the secret: you don’t need to master sugar thermometers, heavy cream, or elaborate stovetop techniques to make perfect caramel. You don’t even need to stir a pot.
All you need is one humble can of sweetened condensed milk and a little bit of time.
This method — one that has quietly circulated through kitchens for generations — transforms a can of condensed milk into velvety, toffee-colored caramel using nothing but water, patience, and a slow cooker. It’s effortless, foolproof, and the kind of old-fashioned trick that every home cook should know.
Today, we’ll dive deep into this timeless technique — not just the simple directions, but the science, variations, serving ideas, storage tips, and all the little secrets that make this recipe a showstopper.
Get ready to discover how a can of milk becomes liquid gold.
🥫 The Wonder Ingredient: Sweetened Condensed Milk
Before we begin, let’s take a moment to appreciate the star of the show — sweetened condensed milk.
This pantry staple is nothing more than milk with most of its water removed and sugar added. The result is a thick, creamy, and intensely sweet liquid that lasts for months without refrigeration. Its texture is smooth and sticky; its flavor is pure comfort.
What makes it perfect for this recipe is its composition — the balance of milk proteins, sugar, and fat. When exposed to heat over time, the sugars undergo the Maillard reaction, a natural caramelization process that creates that deep amber color and toasty flavor we associate with classic caramel.
And unlike stovetop caramel, which can burn in seconds, sweetened condensed milk caramelizes slowly, evenly, and beautifully — especially when cooked gently in a slow cooker.
⏳ Why the Slow Cooker Method Works So Perfectly
Many people first discover this recipe through whispers from a grandmother, a friend, or a baking group — “Did you know you can turn condensed milk into caramel without stirring?”
It sounds like magic, but it’s pure science.
A slow cooker, also known as a crock pot, maintains a steady low temperature — typically around 185°F to 200°F (85°C to 93°C) — well below boiling. This even heat allows the condensed milk to caramelize gradually without burning or scorching.
The can acts like a sealed vessel, keeping moisture inside and preventing any evaporation. The result after several hours?
A rich, smooth caramel known in many parts of the world as dulce de leche — literally “sweet milk.”
The slow cooker method is preferred over boiling on the stove because:
- There’s less risk of overheating or exploding cans, thanks to the stable temperature.
- It’s hands-free — you can set it, walk away, and come back to perfection.
- The flavor develops deeper and creamier over long, slow heating.
It’s the lazy cook’s dream come true.
🍮 Step-by-Step: Turning Condensed Milk into Caramel Gold
Here’s the exact method — the one that transforms a single can of condensed milk into something worthy of drizzling, spooning, or eating straight out of the jar.
Ingredients
- 1 (14-ounce) can of sweetened condensed milk
- Water (enough to cover the cans by at least 2 inches)
That’s it. Nothing else. No butter, no cream, no whisking — just milk, sugar, and time.
Directions
Step 1: Prep the Can
First, remove the label from the can of condensed milk. You want to ensure there are no bits of paper or glue remaining, as they can float in the water and create a mess during cooking.
If you’re making a larger batch, you can cook multiple cans at once — just make sure they’re laid on their sides and not stacked directly on top of each other.
Step 2: Place the Cans in the Slow Cooker
Lay the can (or cans) on its side in the slow cooker. Placing it horizontally helps distribute heat evenly and prevents “hot spots” on one end of the can.
Step 3: Add the Water
Fill the slow cooker with enough hot tap water to cover the cans completely. Make sure there’s at least 2 inches of water above the top of the can — this buffer is crucial.
If the water level drops too low, the pressure inside the can can build, potentially leading to bursting or leaks. Maintaining full submersion ensures consistent heating and safety.
Tip: Some cooks like to place a small folded kitchen towel at the bottom of the slow cooker before adding the cans. This cushions the cans and prevents any rattling or scratching of the slow cooker base.
Step 4: Set and Forget
Turn the slow cooker on Low. Let the cans simmer gently for 8 hours.
Yes, it takes time — but it’s entirely hands-off. You don’t need to stir, check, or babysit.
As the hours pass, the milk inside will slowly darken and thicken, moving from pale ivory to a golden tan and finally to that classic deep caramel color.
If you prefer a lighter caramel (with a thinner texture and milder flavor), reduce the cooking time to about 6 hours.
If you like it richer and darker, go for 9 hours — just make sure to top up the water level halfway through if needed.
Step 5: Cool Before Opening
When the cooking time is complete, do not open the can immediately.
This is one of the most important safety steps. The contents inside are extremely hot, and the internal pressure can cause caramel to erupt if opened too soon.
Using tongs, carefully remove the cans from the slow cooker and place them on a towel or cooling rack. Let them cool completely at room temperature — this may take a few hours.
Only once they’re fully cooled should you open them. The caramel inside will be perfectly smooth, thick, and spreadable.
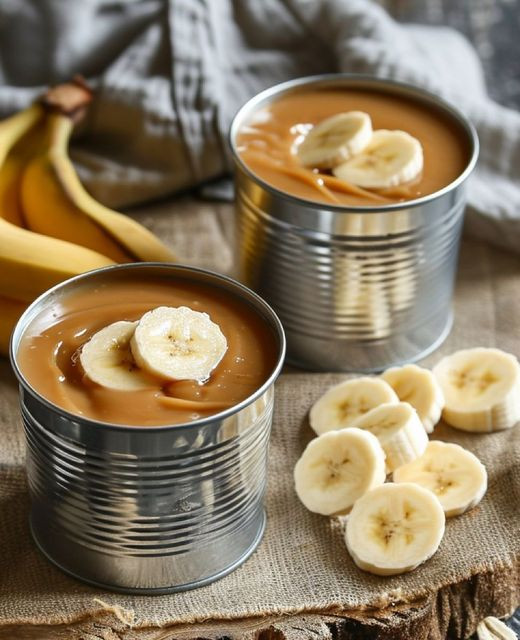
Step 6: Open and Enjoy
When you finally open the can, you’ll reveal a luscious, golden-brown caramel with a creamy texture and rich, toasted sweetness.
Give it a quick stir with a spoon to smooth out any slight separation, and it’s ready to use.
It’s that simple — no pots, no thermometers, no guesswork.
🍯 What You’ve Just Made: Dulce de Leche
The caramel you’ve created is known as dulce de leche in Spanish-speaking countries, literally “sweet milk.”
It’s a beloved staple across Latin America — drizzled over cakes in Argentina, spooned into crepes in Mexico, and layered between cookies in Uruguay. Its flavor is deeply caramelized, with hints of butterscotch and toasted sugar, yet it retains a soft, milky undertone that makes it irresistible.
The slow cooker method creates a version nearly identical to the traditional stovetop dulce de leche that requires hours of stirring. The texture is silky, the color a perfect golden-brown, and the taste… pure heaven.
🧈 The Science Behind the Transformation
So what actually happens inside that can during those 8 hours?
It’s all about heat, sugar, and protein.
- The Maillard Reaction:
As the condensed milk heats, the milk proteins react with the sugars, creating hundreds of flavor compounds. This is the same chemical process that browns bread or sears meat — only here, it produces those rich, caramelized notes. - Water Retention:
The sealed can prevents moisture from escaping. This means the sugar and milk solids don’t crystallize or burn, resulting in a smooth, glossy consistency. - Even Heat Distribution:
The slow cooker maintains a stable low temperature, ensuring that caramelization happens evenly throughout.
In essence, this is caramel alchemy — transforming sugar and milk into something deeper, richer, and utterly indulgent.
🎨 Variations for Flavor and Texture
The beauty of this method is its versatility. Once you’ve mastered the base version, you can easily customize your caramel to suit your taste or recipe.
1. Light Caramel (Soft and Buttery)
Cook for 6 hours instead of 8. The result will be pale gold, with a thinner, drizzle-worthy texture that’s perfect for ice cream or pancakes.
2. Medium Caramel (Classic Dulce de Leche)
Cook for 8 hours. The flavor deepens, and the texture becomes thick and creamy — ideal for spreading, dipping, or spooning straight from the jar.
3. Dark Caramel (Toffee-Like Richness)
Cook for 9 to 10 hours. The caramel turns darker, almost copper-colored, with a slightly firmer consistency and intense toffee flavor.
🍨 Delicious Ways to Use Your Homemade Caramel
Once you’ve opened that can of golden sweetness, the possibilities are endless. This caramel can enhance almost any dessert or snack. Here are some of the best ideas to make the most of your homemade treasure:
1. Spread on Toast or Biscuits
A classic Latin American breakfast features dulce de leche spread over warm toast or buttery crackers. It melts slightly into the bread, creating a sweet, creamy layer that pairs beautifully with coffee or tea.
2. Drizzle Over Ice Cream
Scoop your favorite vanilla ice cream and drizzle warm caramel over it. The contrast between cold and warm is irresistible — a comfort dessert that never gets old.
3. Swirl into Brownies or Cheesecake Batter
Before baking, spoon dollops of caramel into brownie or cheesecake batter and swirl gently with a knife. The result is a marbled masterpiece with pockets of gooey sweetness.
4. Dip for Fruit
Slice apples, bananas, or strawberries and serve them with a small bowl of caramel for dipping. It’s a simple, crowd-pleasing treat for parties or movie nights.
5. Filling for Sandwich Cookies
Click page 2 for more