What is limescale?
Limescale is a hard, chalky deposit composed primarily of calcium carbonate (CaCO₃)– and often some magnesium compounds – which precipitate out of hard water when it is heated or allowed to sit on surfaces and evaporate. In areas with high mineral content (hard water), every time you use your shower, the water that remains on taps, shower‑heads, faucet surfaces will gradually leave behind a thin film of minerals. Over time, this layer builds up, becomes thicker, crusty, and eventually obscures the chrome, brass, stainless steel or other finish of your shower faucet.
Why limescale builds up on a shower faucet
- Your faucet is constantly exposed to water splashes, mist and residual water droplets. Each drop can leave behind minerals when the water evaporates.
- Shower areas often have lots of leftover moisture, steam, inadequate ventilation—conditions that favour deposit formation.
- Finishes with small joints, crevices, aerator openings, handles, and edges tend to gather deposits more easily because water sits there longer.
- If routine cleaning is skipped, the limescale starts to adhere strongly, traps dirt, soap‑scum, and becomes much harder to remove later.
- The longer the build‑up stays, the more it can cause aesthetic issues (dull, white crust, discoloured metal) and even functional issues (blocked aerator, slower water flow, spray pattern issues).
Effects of severe limescale on your shower faucet
- Loss of the bright finish or “like new” sparkle; chrome or stainless looking dull, whitish, etched.
- The faucet may look patchy with white/grey mineral crust around joints, handles, base, spout.
- The aerator or outlet may become pitted or partially blocked, reducing flow or causing uneven spray.
- The deposit may trap soap residue, grime, making it hygienically less clean and harder to keep looking good.
- In extreme cases, the mineral may begin to damage the finish (etching, corrosion under), or make moving parts (handles) stiff.
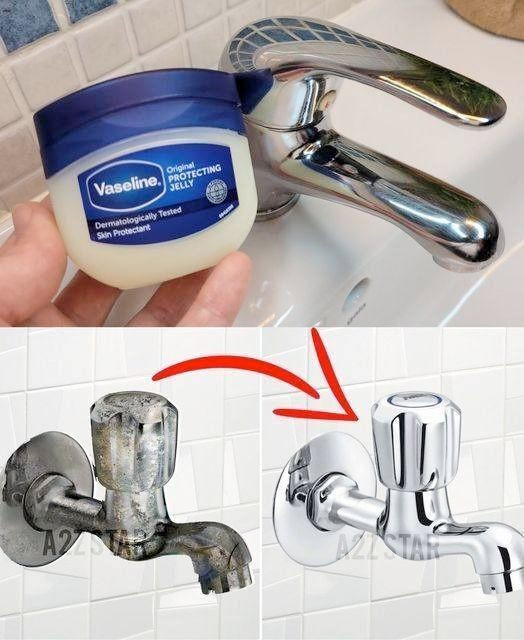
Given all this, restoring the faucet to near‑new appearance requires descaling (removing the mineral deposit) + refinishing/cleaning + protection + maintenance. Let’s walk through the full process.
Preparation: Tools, Materials, Safety & Assessment
What you’ll need: tools & materials
- Soft microfiber cloths, lint‑free cotton cloths
- Soft sponge (non‑abrasive) or soft scrubbing pad (if needed)
- An old toothbrush or small soft‑bristle brush (for crevices)
- A plastic or silicone scraper (optional, for very tough crust)
- White distilled vinegar (if you choose natural acid method)
- Or a citric acid based descaler (a powdered or liquid product designed for limescale)
- Spray bottle (for vinegar/water or descaler solution)
- Warm water (for rinsing)
- Rubber gloves and safety goggles (some acids or cleaners can splash)
- Plastic bag or cling‑film (for soaking parts in vinegar)
- Silicone seal or masking tape to protect surrounding areas if necessary
- Towel or bath mat underneath to catch drip/clean‑up mess
- (Optional) Chrome or metal polish for post‑cleaning finish
- (Optional) Protective wax or sealant for metal finish to discourage future limescale.
Safety & finish‑protection considerations
- Before spraying or soaking any cleaner, check the finish of your faucet. Some finishes (brushed nickel, matte black, vintage brass, designer coatings) may be more sensitive to acid or strong chemicals. Using strong acid on certain coated finishes might damage the finish permanently.
- Use gloves and goggles if you handle strong descalers or acids.
- Ventilate the bathroom well—especially if using chemical descaler.
- Don’t use abrasive steel wool or harsh scrubbing pads on delicate finishes—these may scratch or dull.
- Always test a small inconspicuous area first to ensure no finish damage.
- Avoid combining cleaning chemicals (e.g., acid + bleach) as it may cause chemical reaction or damage.
- If your faucet has electronics, digital display, or non‑metal decorative features, be especially cautious around moisture and cleaning agents.
Assessment: How bad is the limescale?
Before starting, survey the faucet:
- How thick is the crust of mineral deposit? Light haze vs heavy buildup?
- Where is it located? Around base, spout, handle joints, aerator, inlet hoses?
- Is flow affected? Does the spout look blocked, or is spray irregular?
- What is the finish? Chrome, stainless, brass, matte black, designer?
- Any damage already (etching, pitting, discolouration)?
- How long since the last deep clean? Is water hardness known (very hard water region = more frequent maintenance)?
This assessment helps decide whether you can do a light cleaning or need a deep refurbishment.
Step‑by‑Step: Deep Cleaning & Descaling to Make It Look “Like New”
Step 1: Initial Wipe‑Down & Remove Loose Deposits
- Turn off the faucet (if needed). Lay a towel under the base to catch drips.
- Using a dry microfiber cloth, wipe the faucet thoroughly—spout, handles, base and any visible joints. This helps remove the top‑layer loose dust, soap‑film and water spots, which allows subsequent cleaner to access the mineral beneath.
- Use a toothbrush or soft brush to gently sweep along the base seal line, handle joints and spout exit where mineral tends to gather. Don’t scrub hard yet—just loosen visible crud.
- Rinse with warm water once if needed to remove soap residue. Dry with clean cloth.
Step 2: Choose Your Descaling Method
Option A: Natural acid method (vinegar or lemon/citric acid)
- Mix equal parts white distilled vinegar + warm water in a spray bottle (or undiluted vinegar for tough spots).
- Alternatively, dissolve about ½ teaspoon citric acid powder in warm water (safer on some finishes).
- Using the spray bottle, spray the solution onto areas with mineral buildup (avoid overspray onto tiles or grout if you’re worried).
- For localized areas (e.g., base of faucet), you can soak a cloth in the solution, wrap it around the tough deposit, and let it sit 15‑30 minutes (for moderate deposits) or up to 60 minutes for heavy buildup.
- For extra thick crust, you can fill a plastic bag with vinegar solution, fit it over the faucet spout or body, secure with a rubber band, and let it soak while you do something else.
Option B: Commercial descaler (citric acid‑based or mild acid cleaner)
- Using a product labelled safe for faucets, apply to a soft cloth rather than spraying directly.
- Wipe the cloth onto the surface, leave the product for the recommended time (10‑15 minutes for moderate scale, up to 30 minutes for heavy).
- Avoid overly abrasive scrubbing or brushes.
- This method tends to act faster but has to be matched to your finish compatibility.
Step 3: Manual Scrubbing of Deposits
- After the soaking time, return with your soft sponge or non‑abrasive pad. Gently rub the areas where the deposits were. You should notice the crust softening, puffing or breaking away.
- Use the toothbrush to get into seams, around handle bases, under spout, around aerator opening.
- For very tight nozzles or jets (if your faucet has spray holes), you can poke gently with a toothpick or pin (protected with cloth) to clear mineral.
- Rinse the faucet with warm water frequently during this process to remove loosened minerals and acid residue.
Step 4: Rinse Thoroughly & Dry
- Once the limescale appears removed (you’ll see a clean metal or chrome surface, no whitish deposit), rinse the entire faucet with clean warm water.
- Dry it immediately with a new clean microfiber cloth, buffing to a shine. This prevents water spots forming immediately after.
- For a super polish, you can apply a small amount of metal polish (if appropriate for finish) following the manufacturer’s instructions, then buff again.
Step 5: Reassemble or Check Aerator/Outlet (if needed)
- If you removed the aerator or unscrewed any outlet parts earlier, make sure to re‑install tightly (but not over‑tightened) and check for leaks.
- Turn on the faucet and test the water flow. Ensure the spout or shower line flows smoothly and no wear/damage has appeared.
- Check the handles to make sure they operate smoothly and without stiffness.
Step 6: Final Inspection & Finish
- Inspect every angle under good lighting. Look for any hazy patches, remaining crust, dull finish. If you see anything, repeat the targeted soak‑rub‑rinse in those spots.
- For extra “like new” finish, apply a thin protective wax or metal sealant approved for bathroom fixtures. This helps water bead off and slows future mineral adherence.
- Admire the newly restored faucet! It should now look significantly closer to its original finish: smooth, shiny, clean, no white crust.
Finish and Material Considerations: Chrome, Brass, Matte Finishes
Different faucet finishes behave differently and require slightly different care:
Chrome / Stainless Steel
- These finishes are typically more resilient to mineral deposits and acids if cleaned properly.
- The aim is to restore the shine—you will want to buff after cleaning with a dry microfiber to bring back the polish.
- Avoid using corrosive materials (strong acids for prolonged exposure) as they can etch the chrome.
Brass / Polished Brass
- Brass can tarnish or change colour if harsh cleaners are used. Using milder acids (citric acid) is preferred.
- After cleaning, you may use a brass‑safe polish to restore a golden finish and then seal.
Matte Black or Designer Coated Finishes
- These are more delicate—acid cleaners (vinegar, lemon) may cause finish damage or discolouration if left too long. Use caution and test a small area.
- Use soft cloths only; avoid abrasives.
- After cleaning, use a microfiber cloth to wipe dry and consider applying a finish‑coating or sealant designed for matte finishes.
Mixed Materials (metal + plastic parts)
- Many shower faucets have plastic trim, decorative rings or rubber parts. Avoid allowing acid to pool on plastic or rubber as it may degrade.
- Make sure to rinse thoroughly and avoid contact of strong cleaner with non‑metal parts.
Long‑Term Prevention: How to Keep the Faucet Looking Like New
Cleaning once is great—but prevention means you’ll clean less often and keep the faucet looking good longer. Here are key preventive strategies.
1. Dry After Each Use
After using the shower, wipe down the faucet surfaces with a dry cloth to remove residual water droplets. This prevents minerals from depositing as water evaporates. A simple habit—taking 30 seconds—goes a long way.
This is one of the best prevention tactics.
2. Improve Ventilation
Since mineral deposits form more in humid, warm conditions with slower evaporation, make sure your bathroom is well‑ventilated: open window, use extraction fan, leave door open or use a dehumidifier if needed. This reduces steam and lingering residual water.
3. Use a Water Softener or Water Conditioner
If you live in a hard water area, consider installing a water softener or conditioner (ion‑exchange or scale‑inhibitor type) which will reduce calcium and magnesium content and dramatically slow limescale formation—all fixtures including your shower faucet will benefit.
4. Use a Regular Mild Clean
Every couple of weeks, perform a light wipe of the faucet with mild soap and water or a 50/50 vinegar‑water spray (if safe for your finish). This stops buildup before it becomes crusty. Think of it as “maintenance cleaning”.
As one guide said: “The longer it sits, the harder it is.” So catch deposits early.
5. Apply a Protective Coating
After deep cleaning, apply a clear metal sealant or thin coat of protective wax (appropriate for bathroom fixtures) to help water bead off and reduce mineral adherence. This reduces cleaning frequency.
6. Monitor Outlet/Aerator
The spout or aerator (if your faucet has one) may get partially blocked by mineral deposits, reducing flow. Frequently unscrew and inspect the aerator screen, clean it out. Better flow = less residual sitting water.
7. Avoid Harsh Cleaning Agents
Avoid aggressive acids (hydrochloric, formic) or abrasive scrub pads on finishes. These may damage the fixture and ironically make future cleaning harder (rough surfaces trap minerals more).
Stick with safe mild acids (citric) or manufacturer‑approved cleaners.
Troubleshooting & “When Deep Cleanup Isn’t Enough”
Sometimes the buildup is so advanced, or the finish so damaged, that the faucet won’t look perfectly new without additional steps. Here’s what to do.
Issue: The finish is etched or pitted
If, after cleaning the mineral deposit, the metal surface is dull, has microscopic pits, or looks etched (as though mineral has worn the metal surface), you may consider one of these options:
- Use a metal polish (for chrome or stainless) to buff out minor etching. Use a very fine polish, designed for faucets.
- If the finish is severely damaged (matte black peeling, brass heavily tarnished, chrome worn through), it may be time to replace the faucet. Given the low cost relative to frustration, replacement may be the best long‑term value.
Click page 2 for more