There are many reasons to learn this recipe, from its flavor impact to its versatility and value. Let’s unpack the benefits:
Satisfying, complete meal
These rolls deliver protein (from the meat), carbohydrate (from the rice or grain), vegetables (the cabbage leaf wrap), and a flavorful sauce. One dish, many components.
Great for feeding a crowd or prepping ahead
Once you’ve made the filling and prepared the leaves, it becomes about layering and slow cooking. It scales up easily for multiple servings, leftovers, or for freezing.
Comfort‑food appeal with premium flavour
The tomato‑meat‑herb combination is timeless. When you cook it right — with the right fat content in the meat, the right seasoning, good sauce base and proper cooking time — you elevate what could be a humble dish into something richer and more refined.
Economical yet high‑quality
By choosing ground meat blends (e.g., beef + pork) or higher‑grade meat, you can balance cost and quality. Also, rice or grains stretch the meat mixture, making it efficient.
Versatility & customization
You can tweak the meat type (beef, pork, lamb, turkey), swap the grain (rice, barley, quinoa), change up the sauce (tomato‑based, broth‑based, cream‑based in some traditions), and adjust herbs/spices to suit your cuisine style (Eastern European, Middle Eastern, Mediterranean).
Leftovers & freezer friendly
These rolls refrigerate well and freeze even better — a major win for make‑ahead dinners or batch cooking.
With all of that in view, let’s dive into the detailed recipe and techniques.
Ingredient list & quality choices
Below is what you’ll need — divided into main components: the cabbage (wrapper), the meat‑rice filling, the sauce, plus optional garnish/side items. I’ll also include premium substitutions and cost‑effective alternatives, so you can tailor to your budget or taste.
For the cabbage “wrap”
- 1 large head of green cabbage (or Savoy cabbage) — choose one with firm, unblemished outer leaves and tight head.
- Option: you could use a mix of green and Savoy if you prefer softer inner leaves for rolling.
- Optional: 2‑3 extra leaves reserved for lining the base of the pot (to prevent sticking and to absorb sauce).
For the meat & rice filling
- 1 lb (about 450 g) ground beef — aim for an 80/20 lean/fat ratio for juicy flavour.
- Or combine: ½ lb ground beef + ½ lb ground pork (for extra richness).
- 1 cup (about 200 g) cooked long‑grain white rice (or use ¾ cup uncooked rice which you’ll cook in advance).
- 1 medium onion, finely diced (or grated for texture).
- 2‑3 cloves garlic, minced.
- 1 large egg (binds the mixture).
- 2 tablespoons fresh parsley, chopped (or 1 tablespoon dried, if fresh not available).
- 1 teaspoon salt (adjust to taste).
- ½ teaspoon black pepper.
- ½ teaspoon smoked paprika (or sweet paprika) — optional but adds depth.
- Optional premium: ¼ teaspoon ground caraway or allspice (common in some Eastern European variants) for extra flavour.
- Alternative: If you prefer, you could substitute part of the rice with barley, quinoa or bulgur (for texture variation).
For the sauce
- 1 (28‑oz) can (or equivalent measurement) crushed tomatoes (or tomato purée + diced tomatoes).
- 2 tablespoons tomato paste (for richer base).
- 1 cup beef or vegetable broth (or water if you’re keeping cost down).
- 1 tablespoon brown sugar (balances acidity).
- 1 bay leaf.
- 1 teaspoon dried dill (or fresh if you have it — chopped).
- Salt & black pepper to taste.
- Optional: 1 tablespoon Worcestershire sauce (for umami boost) or a splash of red wine for depth.
- Optional premium twist: Finish with a drizzle of good olive oil or an extra sprig of fresh dill or fresh parsley for garnish.
Optional garnish / side
- Sour cream or plain yogurt (a traditional accompaniment in some versions).
- Fresh chopped dill or parsley.
- Lemon wedges (for a fresh acid finish if desired).
- Side: mashed potatoes, boiled potatoes, rye bread, or a simple green salad.
Tools & equipment
- Large pot or Dutch oven with a lid (for layering and simmering the rolls).
- Large bowl for mixing the filling.
- Sharp knife and cutting board.
- Sieve or colander (for blanching cabbage leaves).
- Measuring cups/spoons.
- Optional: large tray or board for assembling rolls, and parchment or foil if using oven method.
Step‑by‑step preparation & cooking
Here we go. Follow these steps carefully for best results. I’ll break them into three phases: preparing the cabbage leaves, making the filling, rolling & layering the rolls, and cooking/finishing.
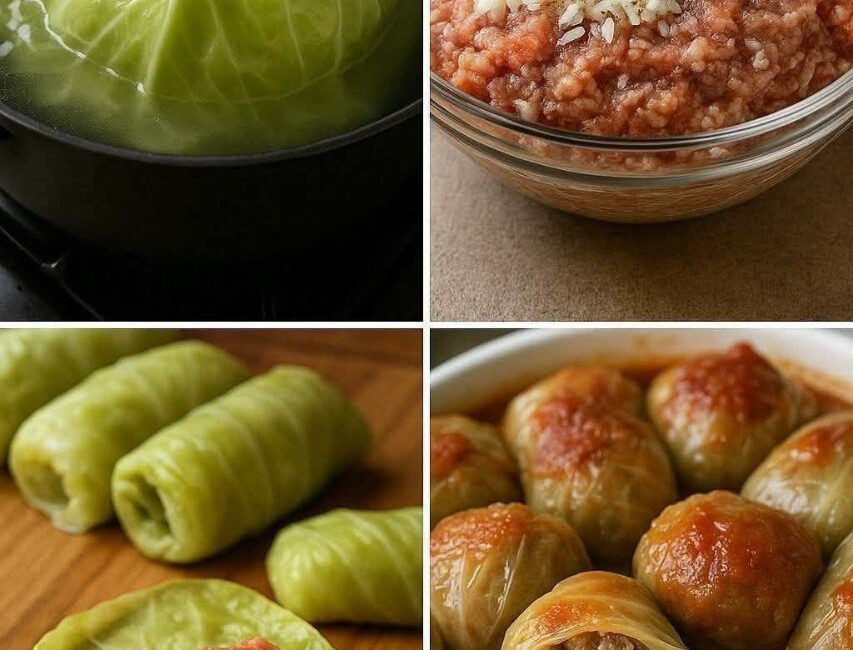
Phase 1: Prepare the cabbage leaves
- Remove the core of the cabbage head: with a sharp knife, cut around the core in a cone‑shape, so you can loosen the outer leaves more easily.
- Bring a large pot of water to a boil. Add a pinch of salt. Immerse the cabbage head (core side down) just so the outer leaves soften — about 2 to 4 minutes. You don’t want the leaves mushy — just pliable.
- Remove the cabbage head and allow to cool slightly so you can handle it.
- Gently peel away the outer leaves one at a time. You’ll need about 12‑16 large leaves (depending on head size and roll size). If some leaves are torn or have large central ribs, you can either discard them or trim the thick rib area so rolling is easier.
- For each peeled leaf, trim the thick center rib so the leaf can fold easily (especially near where you’ll place the filling). Some cooks shave the rib flat or slice a shallow V from the base of the rib to reduce bulk.
- Lay the leaves flat, upside down (vein side up) on your work surface.
Phase 2: Prepare the meat & rice filling
- If you’re using uncooked rice, cook it first per package instructions, allow it to cool slightly. It should be tender but not mushy.
- In a large mixing bowl, combine: ground beef (or beef + pork mix), cooked rice, diced onion, minced garlic, egg, parsley, salt, pepper, paprika (if using), and any optional spices (caraway/allspice). Using your hands or a spoon, mix until just combined — avoid over‑mixing, which can make the mixture dense.
- For best texture, you want the filling moist yet firmly cohesive so it holds its shape when rolled. If it seems too loose, you could add a small amount of breadcrumbs (½ cup or so) or a little more cooked rice. If it’s too dry, a tablespoon of broth or a drizzle of oil helps.
- Optionally, you could lightly fry a small test patty of the mixture and taste for seasoning — adjust salt/pepper as needed before rolling.
Phase 3: Rolling and layering
- On each cabbage leaf, place about 2 – 3 tablespoons of the filling mixture (adjust depending on leaf size). Position the filling near the base (stem end) of the leaf, so you can fold sides and roll.
- Fold the left and right sides of the leaf over the filling, then roll from the base upward toward the tip, like a burrito. You’ll create a neat “roll.” Ensure the seam is underneath so it holds.
- Continue until all rolls are assembled. You should have around 12‑16 rolls (depending on how full your leaves and how large you fill).
- In your large pot or Dutch oven: place a layer of extra cabbage leaf or shredded leftover cabbage on the bottom — this prevents sticking and adds flavour. Then place the rolls seam‑side down, snugly next to each other in a single layer if possible. If you have more rolls, you can stack a second layer, but try not to overcrowd.
- Pour the sauce over the rolls: crushed tomatoes, tomato paste blend, broth, brown sugar, bay leaf, dill, salt, pepper (and optional Worcestershire/red wine). The liquid should almost cover the rolls (ideally come up ¾ of the way).
- Gently bring to a simmer on the stovetop, then reduce heat to low, cover and cook for about 60‑75 minutes until cabbage is tender and flavour has melded. Alternatively, you could bake in a 350 °F (175 °C) oven covered for about 1 hour 15 minutes.
- Near the end of cooking, remove the lid, increase heat slightly and reduce the sauce for 5‑10 minutes if you prefer thicker sauce texture. Remove the bay leaf.
Phase 4: Finishing touches & serving
- Check one roll: pierce to ensure internal meat and rice are cooked (no pink meat, rice tender).
- Plate the rolls: place 2‑3 rolls per person, spoon sauce over them.
- Garnish with fresh chopped parsley or dill. Serve with a dollop of sour cream or yogurt if desired.
- On the side: good accompaniment choices include mashed potatoes, boiled new potatoes, crusty bread, or a crisp green salad to balance richness.
- Leftovers store well: once cooled, transfer to an airtight container and refrigerate for up to 3‑4 days. They can also be frozen (in a freezer‑safe container) for up to 3 months. Reheat gently in oven or covered skillet with a splash of broth to prevent drying.
Expert tips & premium tweaks for maximum flavour & texture
Here are advanced insights that help make your dish stand out and deliver an elevated experience.
1. Choose meat with good flavor & fat content
While lean meat saves calories, some fat = more juiciness and depth of flavour. A ground beef/pork blend or beef ground chuck (~80/20) works well. The fat in the mixture keeps the rolls moist during long simmering.
2. Pre‑born rice for better texture
If using rice, pre‑cook it until it’s al dente — just tender. Over‑cooked rice turns mushy inside the roll. Also, allow the rice to cool slightly before mixing with meat so it doesn’t cook further inside and stiffen.
3. Balance the filling moisture
You want the filling cohesive but not runny. If the mixture is too wet, it may separate or the roll may fall apart. If too dry, it will be dense and gritty. Adjust texture with bread crumbs (moderately) or a splash of broth/oil.
4. Use herbs vs. heavy spices
Fresh herbs (parsley, dill) elevate brightness; heavier spices (allspice, caraway) add regional character. In a sauce that simmers long, herbs hold better than super heavy spice blends which might dominate.
5. Layering and sauce infusion
When you assemble rolls tightly in the pot, you maximize flavor transfer from the sauce into each roll. The bottom layer of cabbage or cabbage rib remnants protects against burning and adds subtle sweetness.
6. Slow simmer for depth
Allowing the rolls to cook gently (low heat, covered) for at least an hour ensures the flavors merge: meat, rice, tomato, herbs. A quick high‑heat cook won’t give the same melding.
7. Finish with charcoal‑thick sauce (optional)
If you prefer, you can remove the lid for the last 10 minutes and increase heat slightly to reduce the sauce, concentrating flavour and improving texture. Just watch carefully so it doesn’t dry out.
8. Add richness/twist (optional)
For a richer version: stir in a teaspoon of smoked paprika, a splash of red wine, or a tablespoon of butter at the end. You could also top each roll with a thin slice of bacon or pancetta before cooking for added flavour and presentation.
9. Adapt for dietary needs or flavour profiles
- Lower‑carb/Grain‑free: Replace rice with cauliflower “rice” or omit grain entirely, increasing meat by ~½ cup to compensate.
- Lighter version: Use lean ground turkey or chicken, but increase herbs and flavourings so it doesn’t taste bland.
- Vegetarian twist: Instead of meat, use a mixture of sautéed mushrooms + lentils + rice + herbs, and a vegetable‑based broth in the sauce.
- Spicy variant: Add ½ teaspoon chili flakes or a dash of cayenne in the filling, or a bit of chipotle in the sauce for smoky heat.
Serving suggestions, storage & make‑ahead options
Serving ideas
- Serve 2–3 rolls per person with sauce spooned over generously.
- Garnish with fresh herbs and a dollop of sour cream or yogurt.
- Side options: mashed potatoes, boiled baby potatoes, rye bread, crisp cucumber/tomato salad, sautéed greens.
- For extra polish: drizzle high‑quality olive oil or add lemon zest over rolls to brighten.
Storage & reheating
Click page 2 for more