Transforming ordinary plastic bottles into self‑watering planters is an ingenious marriage of sustainability and practical gardening. Not only does this repurpose otherwise wasted plastic, it also gives your herbs, vegetables, and ornamental plants a steady, safe water source—reducing overwatering, underwatering, and maintenance. In this article, you’ll find a comprehensive deep dive: from basic assembly to advanced modifications and scaling to mini‑greenhouse systems.
Why Use Self‑Watering Planters?
Before jumping into steps, it’s useful to understand the advantages:
- Water efficiency / conservation: Self‑watering systems reduce waste and evaporation, delivering water precisely where roots need it.
- Consistent moisture: Fluctuating soil moisture stresses plants. Self‑watering systems stabilize hydration, boosting growth and reducing wilting.
- Low maintenance: Less frequent watering means less labor, ideal for busy gardeners or vacation periods.
- Recycling / circular design: Reusing plastic bottles turns trash into functional planters, aligning with eco‑friendly and zero waste goals.
- Root health: These planters help roots draw moisture upward through capillary action, promoting deeper root growth and reducing rot risk (if designed properly).
Now let’s go deep into the how, turning a simple concept into a robust, scalable, high‑performance system.
Materials & Tools You’ll Need
When planning your DIY self‑watering bottle planter, gather these:
Materials:
- Plastic bottles – choose sturdy, food‑grade PET bottles (e.g., 1L, 1.5L, 2L soda bottles, or larger).
- Cotton or polyester wick / rope / strip – an absorbent cord that draws water from reservoir to soil.
- Potting mix / soilless mix – use a well‑draining blend (peat, coco coir, perlite, vermiculite).
- Mesh / netting / wire screen – to prevent soil from falling into reservoir.
- Gravel, pebbles, or small stones – optional, for drainage or to act as buffer.
- Scissors or utility knife – for cutting bottles.
- Drill or heated rod – to make holes cleanly for the wick.
- Optional extras: charcoal, perlite top layer, decorative covers, labels, stakes.
Step‑by‑Step Construction: Basic Self‑Watering Bottle Planter
Here is a refined, detailed process to build a reliable self‑watering planter.
Step 1: Select & Prepare the Bottle
- Choose a bottle of suitable size depending on the plant you want to grow. Larger plants need more reservoir capacity.
- Clean the bottle thoroughly: remove labels, wash with soap and water, rinse well to eliminate any residues or chemicals.
- Dry the bottle.
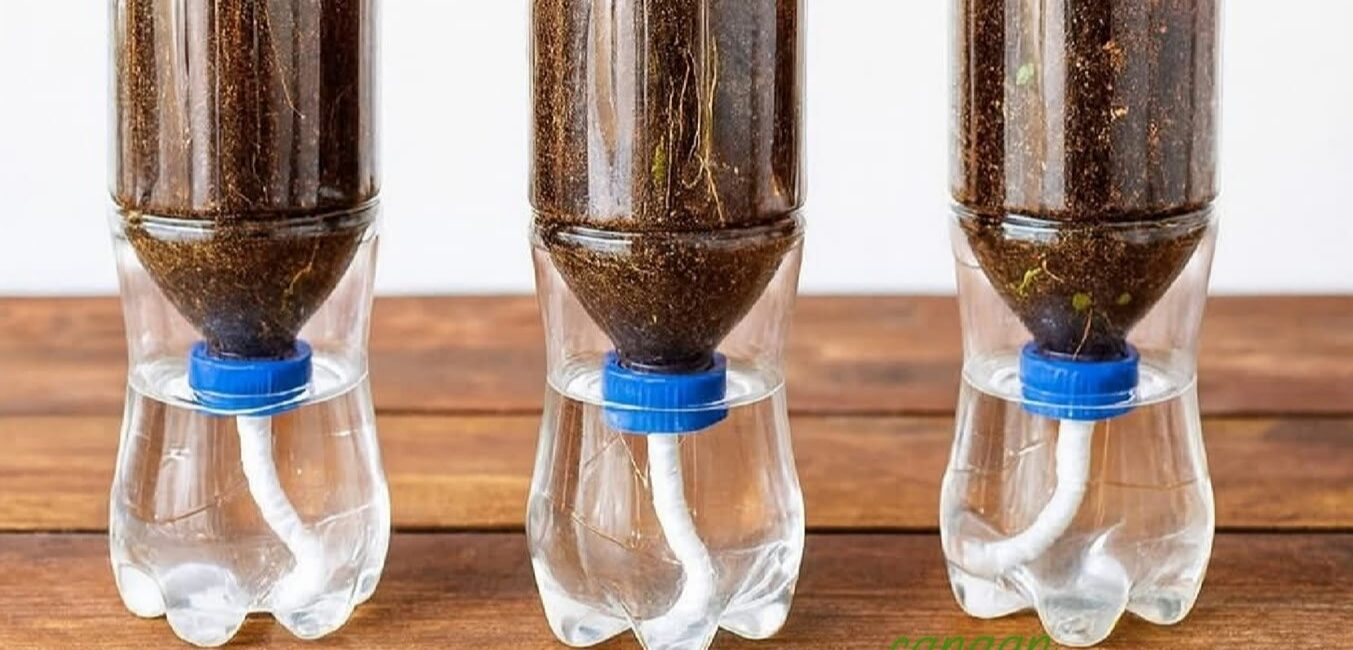
Step 2: Cut the Bottle into Two Sections
- With a sharp knife or scissors, cut the bottle roughly one‑third / two‑thirds split (e.g. top 40% and bottom 60%); or according to plant depth and reservoir needs.
- The upper half (inverted) will contain soil and plant; the bottom half will hold the water reservoir.
Step 3: Prepare the Wick / Water Conduit
- Take your absorbent cord (cotton rope, braided wick, or fabric strip).
- Create a hole in the bottle cap (or in the junction of the top piece) just large enough for the wick to pass through snugly. A heated rod or nail can help melt a clean hole.
- Thread the wick so that one end dangles into the reservoir (bottom half) and the rest passes through into the soil zone.
- Seal around the wick if necessary (with silicone or hot glue) to minimize evaporation or mosquito access.
Step 4: Add Drainage / Mesh Barrier
- Place a piece of mesh or netting over the mouth of the reservoir (or the interior bottom of the inverted top portion) to act as a soil barrier.
- Add a thin layer of gravel or pebbles above the mesh if desired—this helps prevent clogging and ensures a buffer zone.
Step 5: Assemble the Planter
- Invert the top half and place it inside the bottom half (so the wick end lies in the reservoir).
- Adjust so the top section sits stably, and the wick is well submerged.
Step 6: Add Soil & Plant
- Fill the inverted top section with your potting mix—ensure it’s moderately moist but not soggy.
- Plant your herb, seedling, or small plant. Press soil gently around roots.
- Ensure the wick is in full contact with soil below root level.
Step 7: Fill Reservoir with Water
- Pour water (or nutrient solution, if desired) into the bottom half until it reaches just below the soil interface.
- Monitor level over time; top up as needed.
Step 8: Place in Proper Light Conditions
- Position your self-watering planter where the plant can receive suitable sunlight (full sun, partial shade, etc.).
- Take care not to expose the reservoir to excessive heat or sunlight, which accelerates algae growth.
Advanced Enhancements & Design Tweaks
Once you have the basic version working, you can refine and upgrade your design.
Use Activated Charcoal Layer
- Add a layer of activated charcoal between soil and reservoir to filter water, control odor, and prevent root rot or mold growth.
Dual Wick or Multi‑wick Designs
- For larger or deeper planters, use two or more wicks spaced apart to ensure even moisture distribution across the soil volume.
Transparent Water Indicator
- Drill or affix a small transparent tube on the side of the reservoir to act as a water level gauge, so you can visually monitor when to refill.
Capillary Mat Base
- Place a pad of capillary mat under the bottle; it can draw even more water laterally to prop up adjacent pots or seedlings.
Use Hydroponic / Nutrient Solution Option
- Instead of plain water, you can use diluted hydroponic nutrient solution—ideal for leafy greens or herbs—and convert your planter into a mini hydroponic unit.
Insulation & Shade Shields
- Wrap the reservoir in insulating material or opaque material to reduce temperature fluctuations and prevent algae growth.
Modular or Stackable Arrays
- For compact or vertical gardens, design bottles to nest or stack, enabling multi‑level watering networks.
Choosing Plants for Self‑Watering Bottle Planters
Not all plants perform equally well in these systems. Here’s how to pick good candidates:
Ideal Plant Types
- Herbs: basil, mint, parsley, cilantro, chives
- Leafy greens: lettuce, spinach, arugula
- Smaller vegetables: radish, baby carrots, dwarf pepper varieties
- Succulents / small ornamentals (with lower moisture needs, but wick can be reduced)
Consider Root Depth & Growth Habit
Choose plants with shallow to moderate root systems, since your bottle planter has limited soil depth. Deep-rooted plants (e.g. tomatoes, corn) generally require larger containers.
Light & Nutrient Requirements
- Make sure the plant’s light requirements match your placement (sun, shade, partial).
- If using nutrient solutions, adjust concentration to avoid overfertilizing.
Best Practices for Maintenance & Longevity
To keep your self-watering bottle planters thriving over time:
Regular Top-Ups & Monitoring
- Refill the reservoir before it goes dry.
- Observe soil moisture occasionally; if soil becomes overly wet near the surface, reduce wick cross-section or spacing.
Cleaning & Flushing
Click page 2 for more