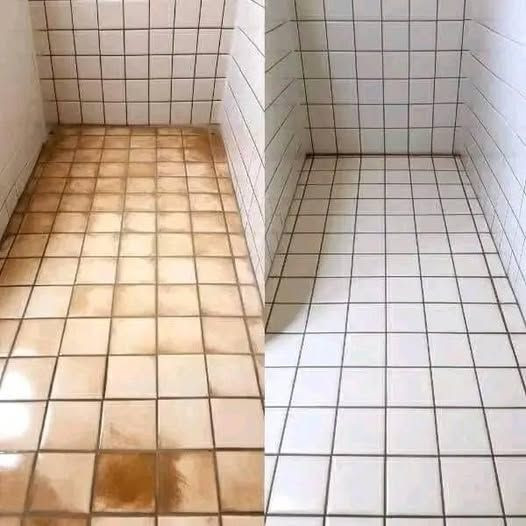
Tiles are a popular choice for floors, walls, kitchens, bathrooms, and even outdoor areas due to their durability, versatility, and aesthetic appeal. However, maintaining their pristine appearance can be challenging. Over time, tiles accumulate dirt, grime, soap scum, mold, mildew, and stubborn stains, which dull their shine and affect the overall look of your living spaces.
If you’re looking for an affordable, eco-friendly, and highly effective way to clean and shine your tiles, look no further than baking soda. This humble household staple, often found in kitchens worldwide, is an incredibly powerful natural cleaner with remarkable versatility. Baking soda not only cleans your tiles deeply but also restores their brightness and shine without the use of harsh chemicals.
This article dives deep into why baking soda is excellent for tile cleaning, how it works, and most importantly, how to use it properly to achieve sparkling clean tiles. Whether you have ceramic, porcelain, natural stone, or even glass tiles, you’ll learn tailored approaches to get outstanding results. Let’s get started!
Why Baking Soda Is a Superior Cleaner for Tiles
Before revealing the step-by-step methods to clean and shine your tiles with baking soda, it’s essential to understand the science and benefits behind this powerful natural cleaner.
1. Mild Abrasive Power for Effective Cleaning
Baking soda (sodium bicarbonate) is a mild abrasive. This means it gently scrubs away stubborn dirt, grease, grime, and soap scum without scratching or damaging delicate tile surfaces. Unlike harsh chemical cleaners or rough brushes that can etch or dull tiles, baking soda provides a safe yet effective polishing action.
2. Natural Deodorizer
Tile surfaces, especially in kitchens and bathrooms, can absorb unpleasant odors from mold, mildew, and trapped moisture. Baking soda neutralizes these odors naturally by balancing pH levels and absorbing smells instead of masking them with synthetic fragrances.
3. Stain Removal and Whitening
Tiles, particularly white or light-colored ones, often develop unsightly stains from dirt, food spills, rust, or hard water deposits. Baking soda’s alkaline nature helps break down acidic stains, making them easier to remove and restoring the tile’s original brightness.
4. Non-Toxic and Environmentally Friendly
Using baking soda for tile cleaning means avoiding the harsh chemicals found in many commercial cleaners, which can harm your health, pets, and the environment. It’s a safe choice for homes with children or allergy sufferers and supports a more sustainable lifestyle.
5. Cost-Effective Cleaning Solution
Baking soda is inexpensive, widely available, and multipurpose. Instead of buying multiple cleaning products for different tile-related issues, baking soda is a one-stop solution that saves money while delivering excellent results.
Types of Tiles and Baking Soda Compatibility
Tiles come in many varieties, and it’s crucial to tailor your cleaning method to your tile type to avoid damage.
Ceramic and Porcelain Tiles
Ceramic and porcelain tiles are the most common flooring and wall tiles due to their water resistance and durability. Baking soda works wonderfully on these tiles by removing surface grime and stains while brightening grout lines.
Natural Stone Tiles (Marble, Granite, Slate)
Natural stone tiles require extra care because they can be sensitive to acidic substances. Baking soda’s mild alkalinity is generally safe when used correctly, but avoid mixing it with acidic ingredients like vinegar or lemon on natural stone. Instead, use a gentle baking soda paste and rinse thoroughly.
Glass Tiles
Glass tiles are sleek and modern but can show water spots and smudges easily. Baking soda can help polish and brighten these tiles, but use sparingly with a soft cloth to avoid scratching.
Mosaic Tiles
Mosaic tiles, often with intricate patterns and multiple materials, benefit from the gentle cleaning action of baking soda, which can reach into tiny crevices and grout lines without damaging the surface.
How to Use Baking Soda to Clean and Shine Tiles: Step-by-Step Methods
Basic Cleaning: Baking Soda and Water Paste
This is the simplest and most versatile method to clean everyday dirt, grease, and light stains.
Ingredients:
- ½ cup baking soda
- Enough water to make a paste (approximately 2-3 tablespoons)
Instructions:
- Make the Paste: Combine baking soda with water until you achieve a spreadable paste consistency.
- Apply to Tiles: Using a soft sponge, cloth, or brush, spread the paste over the tile surfaces. Focus on stained or dirty areas.
- Scrub Gently: Using circular motions, gently scrub the tiles and grout lines. The mild abrasive quality of baking soda will lift grime without damaging the tiles.
- Let Sit: Allow the paste to sit for 5-10 minutes to penetrate stubborn stains.
- Rinse Thoroughly: Use clean water and a mop, sponge, or cloth to remove all baking soda residue. Leaving residue can leave a dull film on tiles.
- Dry and Shine: Wipe the tiles dry with a microfiber cloth for a streak-free shine.
Why This Works: The paste’s alkalinity helps break down acidic dirt and grease, while the gentle scrubbing action lifts and removes grime without scratching.
Deep Cleaning Grout Lines with Baking Soda and Hydrogen Peroxide
Grout lines tend to collect dirt, mildew, and discoloration over time, making tiles look dingy. Baking soda combined with hydrogen peroxide forms a powerful oxygen-releasing cleaning agent that brightens grout and tiles.
Ingredients:
- ½ cup baking soda
- Hydrogen peroxide (3%) – enough to form a thick paste
Instructions:
- Mix Paste: Combine baking soda and hydrogen peroxide to create a thick paste.
- Apply to Grout: Use a toothbrush or small scrubbing brush to apply the paste liberally on grout lines and stained tile areas.
- Let it Work: Allow the mixture to sit for 10-15 minutes. You’ll notice bubbling action, which helps lift deep stains and kill mildew.
- Scrub: Gently scrub the grout and tiles with a brush to loosen dirt and discoloration.
- Rinse and Dry: Rinse with warm water and wipe dry with a microfiber cloth to prevent water spots.
Note: For natural stone tiles, test this method on a small area first as hydrogen peroxide can sometimes cause slight discoloration.
Removing Soap Scum and Hard Water Deposits
Soap scum and hard water deposits can cause tiles to look dull and grimy. Baking soda combined with white vinegar offers an effective cleaning duo.
Ingredients:
- ½ cup baking soda
- 1 cup white vinegar (avoid on natural stone)
Instructions:
Click page 2 for more