When it comes to household chores, cleaning the oven is one of the most dreaded tasks. Whether it’s from spilled food, grease, or the inevitable buildup that happens after repeated use, the oven tends to gather grime in places that are difficult to reach and even harder to clean. One of the toughest parts of cleaning the oven is dealing with the oven rack. These racks get caked with burnt-on grease, food particles, and hard-to-remove stains, making them look dingy and worn over time. Many people will resort to scrubbing, using harsh chemicals, or spending hours soaking them in soapy water—only to find that the grime hasn’t budged or that they’ve caused scratches on the surface.
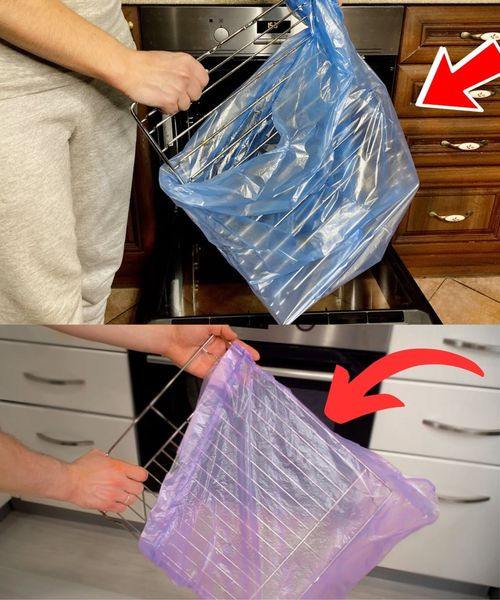
But what if we told you there’s a much simpler, easier, and less physically demanding way to clean your oven racks? What if we told you that you could make your racks look brand new again without scrubbing or using toxic cleaners? Sounds too good to be true? Well, it’s not! The trick is simpler than you think: put the oven rack in a bag.
Yes, you read that right. By using a simple bag and a few common household ingredients, you can restore your oven racks to their pristine condition with minimal effort. The best part? No scrubbing involved! In this article, we’ll dive into why this method works, how to do it step-by-step, and why it’s the best solution for those who want a cleaner, more efficient kitchen without the hassle.
Why Are Oven Racks So Difficult to Clean?
Before we get into the solution, it’s important to understand why oven racks become so difficult to clean in the first place. The main reason oven racks accumulate grime and gunk is because of the heat and the type of cooking that takes place inside the oven.
- High Temperatures: Oven racks are exposed to extreme heat, which causes grease, oils, and food particles to bake onto the surface. Over time, these substances harden and become much harder to remove.
- Food Spills and Splashes: Spills from baking or roasting are inevitable. As you cook, juices from meats, sauces, and other foods splatter and drip down onto the racks. The longer the food remains, the more it becomes baked on.
- Infrequent Cleaning: Often, oven racks are one of those things that get overlooked during routine kitchen cleaning. After a few rounds of cooking, the build-up becomes increasingly difficult to tackle without putting in significant elbow grease.
- Harsh Cleaning Methods: Many traditional cleaning methods involve harsh chemicals like oven cleaners, which can be toxic and harsh on the racks themselves. Additionally, the abrasive nature of scrubbing pads can scratch and damage the rack’s surface.
Given these challenges, it’s no wonder that many people dread the task of cleaning oven racks. But with the right technique, this chore can become a thing of the past.
The Secret to Cleaning Oven Racks Without Scrubbing: The Bag Method
The technique we are about to reveal uses simple ingredients and a plastic garbage bag to create a self-cleaning solution that will lift away all that grime and grease—without the need for scrubbing or toxic chemicals. This method is not only effective but also safe and easy.
The secret lies in the combination of baking soda, dish soap, and ammonia, which together form a powerful cleaning agent that will break down the grease, grime, and burnt-on food. The best part is that this method uses the power of sealing in heat and moisture to help soften the hardened substances, allowing them to be wiped away easily.
What You Need:
- Plastic garbage bag (large enough to fit your oven racks)
- Baking soda (this will act as a gentle abrasive and neutralizer)
- Dish soap (to help break down grease and oils)
- Ammonia (a powerful cleaning agent that helps lift stuck-on food)
- Warm water
- Rubber gloves (optional, for handling ammonia)
- Old towel or newspaper (to protect your work surface)
Step-by-Step Guide to Cleaning Oven Racks with the Bag Method
Now that you have all the ingredients ready, let’s dive into the step-by-step process of how to clean your oven racks without the need to scrub.
Step 1: Remove the Oven Racks
The first step is to remove the oven racks from your oven. Most oven racks simply slide out easily, but if yours is a bit stubborn, gently pull on both sides of the rack to release it. It’s best to remove the racks before you start cleaning so you can lay them down flat and give them ample space to be treated.
Once the racks are out of the oven, take them to a large workspace such as your kitchen counter or even outside, if possible. Lay down an old towel or a few sheets of newspaper on your workspace to protect the surface and avoid any damage from the cleaning process.
Step 2: Create the Cleaning Solution
In a plastic garbage bag, combine the following ingredients:
- 1/4 cup of baking soda
- 1 tbsp of dish soap
- 1 cup of warm water
- 1/4 cup of ammonia
The baking soda will help to scrub and lift grime, while the dish soap breaks down oils and grease. The ammonia works by breaking down the toughest food residues and softening the hardened grease and oil that are typically so difficult to remove.
Once all the ingredients are in the bag, seal it tightly and shake it up to mix everything together. The bag should form a slightly thick paste-like texture inside.
Step 3: Place the Oven Racks in the Bag
Now that your cleaning solution is ready, it’s time to place the oven racks into the garbage bag. Gently slide each rack into the bag, ensuring they are fully coated with the solution inside. You may need to maneuver them around a bit to make sure they are completely covered. The goal is for the racks to be completely submerged in the solution.
Once the racks are inside the bag, make sure to seal the bag tightly to trap the solution in and allow it to do its magic. This will create a slightly steamy, moist environment that helps loosen all the baked-on food and grease from the racks.
Step 4: Let It Sit and Soak
Now comes the waiting part—patience is key here. Let the oven racks sit in the sealed bag for about 8-12 hours (overnight works great). This extended soak time allows the ammonia to break down the hardened food residue and grease, while the baking soda gently lifts and neutralizes odors.
During this time, the moisture and the heat from the ingredients in the bag will soften all the debris that has stuck to the racks, making it much easier to clean. The baking soda and dish soap will also work their way into every crevice of the racks, ensuring a thorough clean.
Step 5: Wipe and Rinse the Racks
After the racks have soaked, it’s time to take them out of the bag. Carefully remove the racks from the plastic bag, as there may still be excess cleaning solution inside. Wearing rubber gloves is recommended, especially when handling ammonia, as it can be irritating to the skin and respiratory system.
At this point, most of the grime and grease should have loosened up significantly. Use a clean cloth or sponge to wipe away the softened food residue. The baked-on grease should come off with very little effort—no need for harsh scrubbing! If you notice any stubborn spots, use a soft-bristled brush or an old toothbrush to gently scrub them away.
After wiping the racks clean, rinse them thoroughly with warm water to remove any remaining cleaning solution. Dry them with a clean towel, and you’ll notice that the oven racks now look good as new!
Why This Method Works
click page 2 to continue