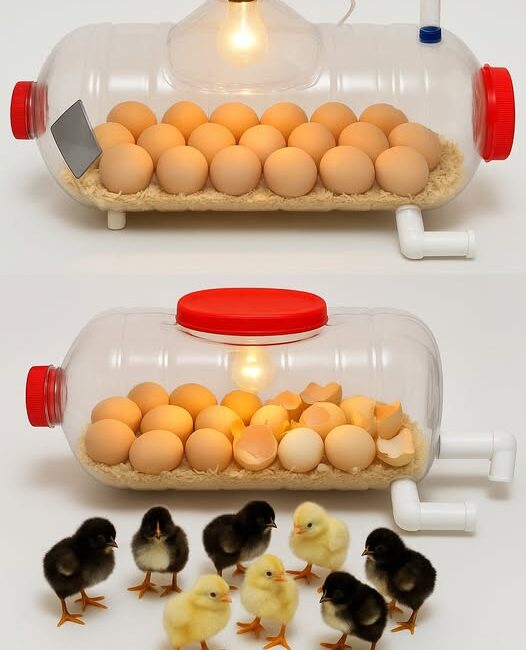
Hatching eggs at home can be a fulfilling and educational experience. Whether you’re raising chickens, ducks, or other poultry, watching eggs develop and hatch into healthy chicks is both fascinating and rewarding. While commercial incubators are effective, they can be costly and may not be accessible to everyone. Fortunately, with creativity and common household materials, you can build a simple, functional egg incubator using a recycled plastic water bottle. This DIY incubator will maintain the appropriate warmth, humidity, and ventilation needed for successful incubation, making it an ideal project for hatchling enthusiasts of all skill levels.
In this article, we will provide a comprehensive, detailed guide to creating your own water bottle egg incubator. We will also explore important tips for selecting eggs, maintaining incubation conditions, and managing the hatching process to maximize success.
Why Build a Homemade Egg Incubator?
Before we dive into the construction process, it’s worth understanding the advantages of making your own incubator:
- Cost-effectiveness: Commercial incubators can be expensive, often costing upwards of $100. Building one from recycled materials like a water bottle is budget-friendly.
- Accessibility: Materials needed are commonly found at home or easy to acquire.
- Educational Value: Constructing and managing an incubator provides hands-on learning about biology, embryology, and poultry care.
- Customization: You can tailor the incubator size and heating elements based on your specific needs and available resources.
- Sustainability: Using recycled materials helps reduce plastic waste.
Essential Materials Needed
Here’s what you’ll need to build your homemade water bottle incubator:
- 1 large, clear plastic water bottle (2 liters or larger recommended)
- Incandescent light bulb (15-25 watts) or another gentle heat source such as a ceramic heat emitter or heating pad
- Aluminum foil or reflective tape to line the incubator interior
- Thermometer (preferably digital) to monitor temperature accurately
- Marker pen to mark cutting lines on the bottle
- Utility knife or scissors for cutting plastic safely
- Tape or glue (duct tape or hot glue recommended)
- Small shallow dish or container for water to maintain humidity
- Small nail, needle, or sharp tool to create ventilation holes
Step 1: Preparing the Water Bottle
Begin by thoroughly cleaning the plastic water bottle inside and out. Remove all labels and adhesive residue to ensure clear visibility of the eggs inside and allow easy temperature monitoring.
Using a marker, draw a horizontal line around the bottle approximately halfway between the base and the neck. This will be your cut line. Make sure the line is even all around.
Step 2: Cutting the Bottle
Carefully cut the bottle along the marked line using your utility knife or scissors. Take your time to make a clean, straight cut, as this will ensure the two halves fit snugly back together later.
You should now have:
- The bottom half: this will serve as the base of your incubator.
- The top half: this will function as the lid.
Step 3: Creating Ventilation Holes
Proper airflow is crucial for embryo development and preventing overheating. Use a small nail or the tip of your utility knife to poke several small holes around the cut edge of the bottom half. Space them evenly, about 1 cm apart, to allow for sufficient ventilation without letting heat escape too quickly.
Step 4: Installing the Heat Source
The incubator’s core requirement is consistent warmth, ideally maintained around 37.5°C (99.5°F).
- An incandescent light bulb (15-25 watts) is ideal because it emits gentle, steady heat.
- Alternatively, a small ceramic heat emitter or heat mat designed for reptiles can be used.
Position the heat source inside the bottom half, near one side to create a warm zone. Secure it with tape or glue if necessary. The goal is to avoid direct contact between the heat source and the eggs while ensuring sufficient warmth throughout the incubator.
Step 5: Adding Reflective Lining
Line the inside of the bottom half with aluminum foil or reflective tape. This reflective surface helps evenly distribute heat by bouncing infrared rays around the incubator, maintaining a consistent internal temperature and reducing heat loss.
Step 6: Inserting the Thermometer
Place a thermometer inside the incubator toward the center but away from the direct heat source to get an accurate measure of ambient temperature. Digital thermometers with probes or wireless monitoring are highly recommended for ease and precision.
Step 7: Assembling the Incubator
Click page 2 for more


