Growing kiwi at home is a rewarding gardening project that brings a touch of the exotic right to your doorstep. While kiwi vines typically require ample space and a trellis system to grow outdoors, you can successfully cultivate this delicious fruit in a pot — even if you’re a beginner gardener. Whether you live in an apartment balcony or have limited garden space, pot-growing kiwi is easier than you think and can yield bountiful harvests with the right care.
In this ultimate guide, you’ll learn how to plant kiwi in a pot step by step — from choosing the right variety and preparing the soil, to watering, feeding, pruning, and troubleshooting common issues. Let’s dive into the lush world of container kiwi cultivation!
Why Grow Kiwi in a Pot?
Before we get into the nitty-gritty, it’s worth understanding why kiwi in a pot is a fantastic choice for many gardeners:
- Space-saving: Perfect for balconies, patios, decks, and small gardens.
- Control over soil conditions: You can optimize soil quality and drainage easily.
- Mobility: Move your plant to catch sunlight or protect it from harsh weather.
- Pest management: Easier to monitor and control pests and diseases.
- Early fruiting: Container-grown kiwi can sometimes produce fruit faster due to focused care.
Step 1: Choose the Right Kiwi Variety for Pot Growing
There are two main types of kiwi commonly grown:
- Hardy Kiwi (Actinidia arguta): Also known as baby kiwi or grape kiwi, this variety has smooth, edible skin and is smaller in size. It’s cold-hardy and more compact, making it ideal for container growth.
- Fuzzy Kiwi (Actinidia deliciosa): The classic fuzzy kiwi fruit with hairy skin. This variety tends to grow larger vines and requires more space and support.
Best Variety for Pots:
- Hardy Kiwi is generally the better option for pot cultivation because of its smaller vine size and less demanding growth habit.
- Dwarf or semi-dwarf cultivars of fuzzy kiwi can work, but they need more maintenance and larger pots.
Step 2: Select the Right Pot and Location
Pot Size and Material
- Choose a large container — at least 18-24 inches in diameter and depth to accommodate root growth.
- Pots made of terracotta, ceramic, or plastic are all fine. Plastic retains moisture better but terracotta provides better breathability.
- Ensure the pot has drainage holes to prevent waterlogging.
Location
- Kiwi vines thrive in full sun (6-8 hours of direct sunlight daily).
- Place your pot near a sturdy structure or trellis for support.
- If you’re in a cold climate, keep the pot in a sunny, protected spot or move indoors during frost.
Step 3: Prepare the Potting Mix
Kiwi plants prefer well-draining, fertile soil with a slightly acidic to neutral pH (5.5-7.0).
Ideal Potting Mix Recipe:
- 2 parts high-quality potting soil or compost-rich soil.
- 1 part perlite or coarse sand to improve drainage.
- 1 part peat moss or coconut coir to retain moisture.
Add organic fertilizer or well-rotted compost to boost nutrients. Avoid heavy garden soil, which can compact and suffocate roots.
Step 4: Planting Your Kiwi Vine
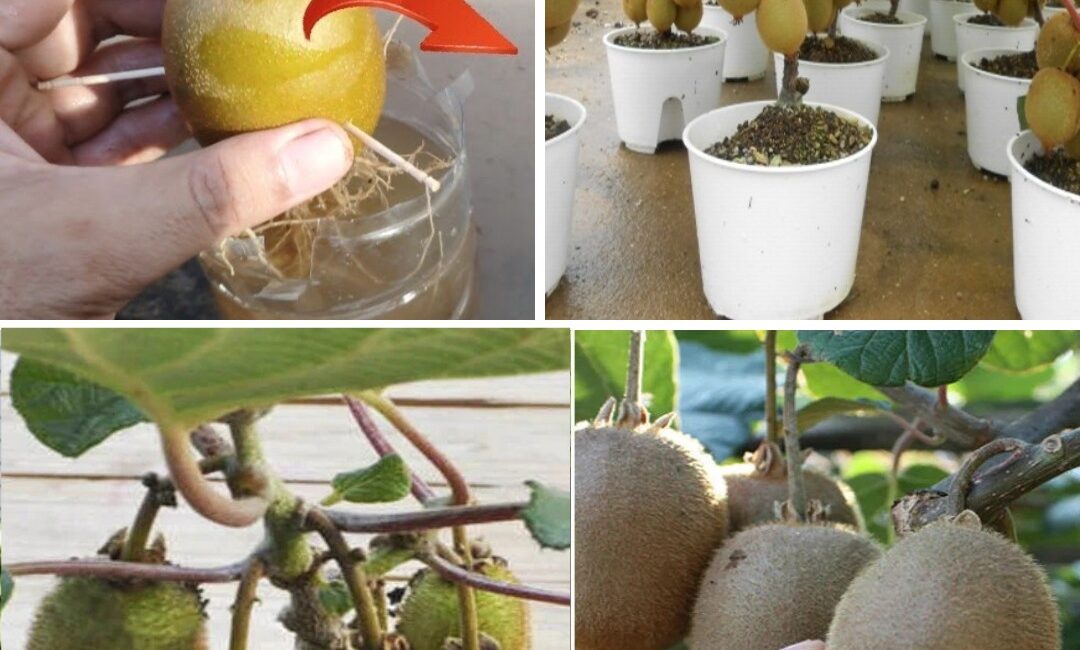
From Seed (Optional but Slow)
- Harvest kiwi seeds from ripe fruit, clean and dry them.
- Stratify seeds by placing them in moist paper towels in the refrigerator for 2-3 months.
- Sow seeds about 1/4 inch deep in seed-starting mix.
- Keep soil moist and warm (70-75°F).
- Transplant seedlings after 6-9 months when they have several true leaves.
Note: Growing kiwi from seed is a rewarding but lengthy process and may not produce fruit true to the parent plant.
From Nursery Plants (Recommended for Beginners)
- Purchase healthy kiwi plants from nurseries or online suppliers.
- Select a male and female plant for fruit production (kiwi is dioecious — male and female flowers on separate plants).
- Plant one male for every 6-8 females.
Planting Steps:
- Fill the pot with prepared potting mix, leaving 3-4 inches from the rim.
- Remove the kiwi plant gently from its nursery container.
- Dig a hole slightly larger than the root ball.
- Place the plant in the hole and backfill with soil, firming gently.
- Water thoroughly to settle the soil.
Step 5: Provide Proper Support and Training
Click page 2 for more