There is something deeply satisfying about growing a plant from a cutting. It feels almost magical—taking a small piece of a living plant, placing it into soil or water, and watching it slowly develop roots, leaves, and eventually blooms. With hydrangeas, this process is not only possible, but surprisingly accessible, even for beginners.
Hydrangeas are among the most beloved ornamental shrubs in gardens around the world. Their lush foliage and large, vibrant blooms make them a centerpiece in landscapes, balconies, and even indoor arrangements. But what many people don’t realize is that hydrangeas are also one of the easiest flowering shrubs to propagate.
If done correctly, a single healthy hydrangea plant can give rise to many more—without the need to buy new plants.
This guide is designed to take you far beyond the basics. You will not only learn how to propagate hydrangeas, but also why each step matters. Understanding the science behind propagation will help you avoid common mistakes, adapt to your climate, and significantly increase your success rate.
By the end of this article, you will have everything you need to confidently propagate hydrangeas and turn simple cuttings into thriving, blooming shrubs.
Understanding Hydrangea Propagation: The Science Behind It
Before diving into techniques, it’s important to understand what propagation actually means.
Propagation is the process of creating a new plant from an existing one. In the case of hydrangeas, this is most commonly done through cuttings—small sections of stem that can develop roots under the right conditions.
Hydrangeas are particularly well-suited for this because they have a strong ability to form adventitious roots, which are roots that grow from non-root tissue such as stems.
When you take a cutting and place it in a suitable environment, several biological processes begin:
- Cells at the cut site start dividing
- Hormones like auxins stimulate root formation
- New root structures emerge and grow into the soil
This process essentially allows the cutting to become a genetically identical clone of the parent plant.
Understanding this helps explain why certain factors—like moisture, temperature, and light—are so important.
When Is the Best Time to Propagate Hydrangeas?
Timing is one of the most important factors in successful propagation.
Rather than focusing strictly on calendar months, it’s more effective to understand the growth stage of the plant.
Hydrangeas go through different phases during the year:
- Active growth (spring and early summer)
- Slowing growth (late summer)
- Dormancy (fall and winter)
Each phase offers different opportunities for propagation.
Softwood Cuttings (Late Spring to Early Summer)
This is the most popular and successful method for beginners.
Softwood refers to young, flexible stems that have not yet hardened.
Characteristics of Softwood:
- Bright green color
- Easy to bend without snapping
- Actively growing
Ideal Timing:
May to July in most temperate climates
Why It Works Well:
Softwood cuttings root quickly because the plant is actively growing and producing hormones that encourage root development.
Hardwood Cuttings (Late Fall to Winter)
Hardwood cuttings are taken from mature, woody stems after the plant has entered dormancy.
Characteristics of Hardwood:
- Brown, rigid stems
- No active leaf growth
- Dormant buds
Ideal Timing:
October to February
Why It Works:
Although slower, hardwood cuttings are more resilient and less prone to drying out.
Choosing the Right Hydrangea for Propagation
Not all hydrangeas behave exactly the same.
Some common types include:
- Hydrangea macrophylla (bigleaf hydrangea)
- Hydrangea paniculata
- Hydrangea arborescens
- Hydrangea quercifolia (oakleaf hydrangea)
Most of these varieties can be propagated using cuttings, but softwood propagation works especially well for bigleaf hydrangeas.
Step-by-Step Guide to Propagating Hydrangeas
Now let’s go into the practical process.
Step 1: Selecting the Perfect Cutting
Choose a healthy, disease-free plant.
Look for stems that are:
- Strong and vibrant
- Free of pests or damage
- Not currently flowering
Avoid stems with blooms, as flowering consumes energy needed for root development.
Cut a section about 10–15 cm (4–6 inches) long.
Step 2: Preparing the Cutting
Remove the lower leaves, leaving only 2–3 leaves at the top.
If the remaining leaves are large, cut them in half to reduce water loss.
This step is important because the cutting cannot yet absorb water through roots.
Step 3: Optional Rooting Hormone
Dip the cut end into rooting hormone powder or gel.
This step is optional but can:
- Speed up root development
- Increase success rate
Step 4: Choosing the Growing Medium
Hydrangea cuttings prefer a light, well-draining medium.
Common options include:
- Potting soil mixed with perlite
- Sand and peat mix
- Coconut coir
Avoid heavy garden soil, as it retains too much water and may cause rot.
Step 5: Planting the Cutting
Insert the cutting about 2–3 inches deep into the soil.
Firm the soil gently around the stem.
Water lightly to settle the soil.
Step 6: Creating the Right Environment
Hydrangea cuttings need:
- High humidity
- Indirect light
- Stable temperature
You can create a mini greenhouse effect by covering the pot with a plastic bag or dome.
Make sure the plastic does not touch the leaves.
Step 7: Watering and Care
Keep the soil consistently moist but not waterlogged.
Too much water can cause rot, while too little can dry out the cutting.
Place the cutting in bright, indirect light—not direct sun.
Step 8: Waiting for Roots
Rooting usually takes 2 to 4 weeks for softwood cuttings.
You can check by gently tugging the stem. If you feel resistance, roots are forming.
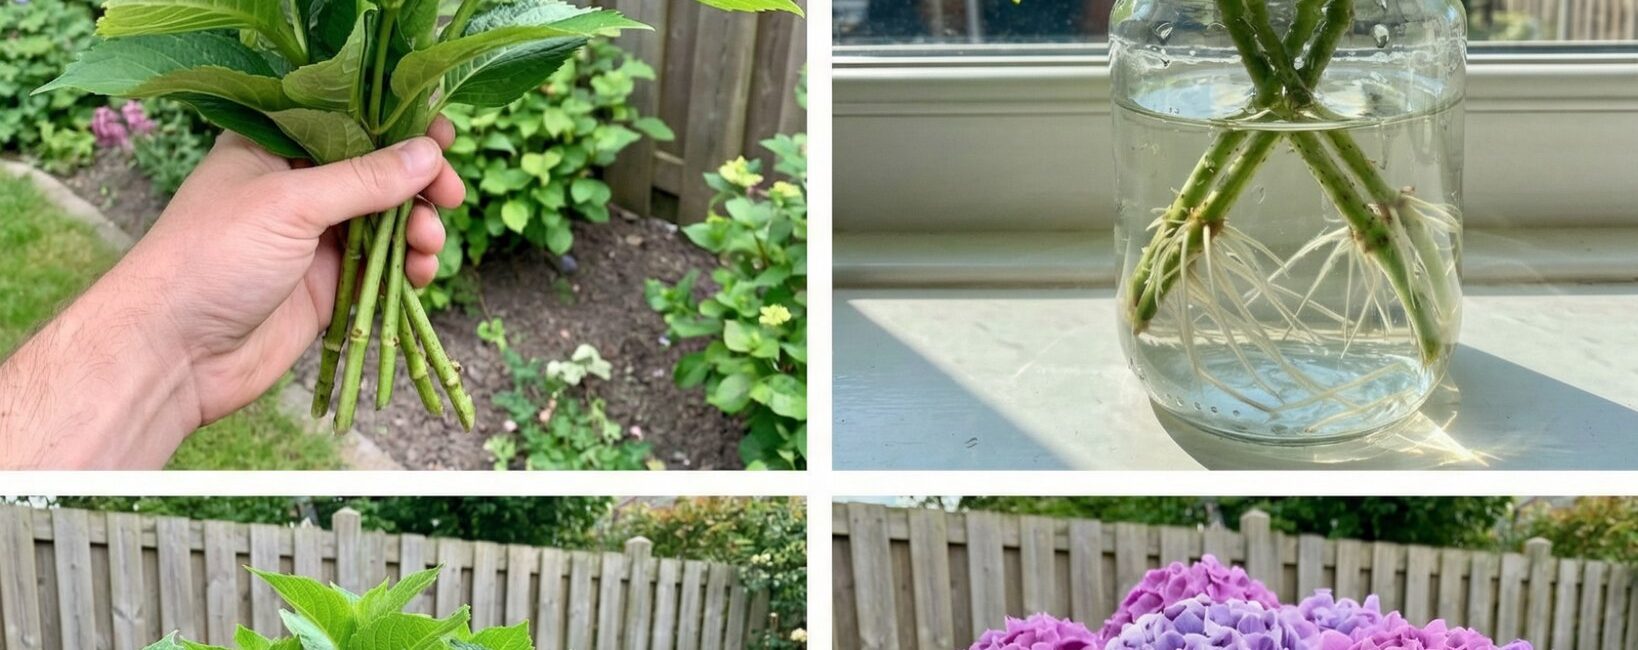
Propagating Hydrangeas in Water
Click page 2 to continue