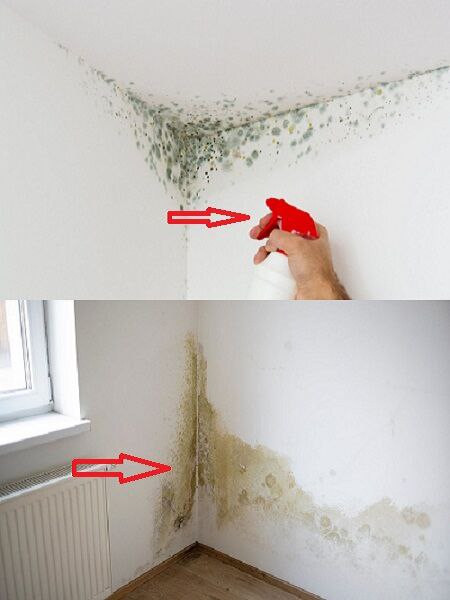
What Mold Is
Mold refers to various species of fungi that grow as multicellular filaments called hyphae. In indoor environments, molds thrive in humid, damp areas with organic matter (wood, drywall, paper, cloth) to feed on. Mold spores are everywhere—floating in air, hitching on belongings—but to become a visible colony, they need moisture, nutrients, and favorable temperature.
Why Mold Grows in Homes
Several environmental factors favor mold:
- Humidity & moisture: Relative humidity over 60% is a red flag; condensation on walls, leaks, or damp basements create microclimates where mold thrives.
- Poor ventilation / airflow: Stagnant air allows moisture to linger on surfaces.
- Leakage / water intrusion: Roof leaks, plumbing leaks, flooding, or seepage introduce moisture.
- Organic surfaces: Drywall, wood, cardboard, fabrics—all feed mold.
- Dark or shaded areas: Mold often avoids strong light; corners, behind furniture, undersides, closets are vulnerable.
When all conditions align, spores germinate, hyphae spread, and visible mold patches appear—often in patches of black, green, white, or fuzzy textures.
Common Indoor Mold Locations
- Bathroom walls, especially near the tub, shower, or sink
- Under or behind sinks, around pipes
- Basement walls, corners, floor/foundation junctions
- Around window sills or frames (due to condensation)
- Behind wallpaper or behind furniture moved against walls
- Inside closets, behind stored items
- On wet or damp rugs, carpets, upholstery
2. The Risks of Mold
Understanding why mold removal is crucial makes the old trick more compelling.
Health Risks
- Allergic reactions: sneezing, runny nose, red eyes
- Respiratory issues: coughing, wheezing, irritation
- Asthma exacerbations in susceptible individuals
- Skin irritation, rashes
- For immunocompromised individuals, mold may pose serious risks
Structural / Property Risks
- Mold can progressively degrade drywall, wood, and other building materials
- It can stain surfaces permanently
- Persistent mold can reduce home value, odors, musty smell
- It may require expensive remediation if allowed to spread too far
Given these risks, it’s wise to act early—before mold becomes entrenched.
3. Why Many Conventional Mold Treatments Are Not Ideal
Before we explore the grandmother’s trick, it’s worth understanding the trade‑offs of common modern solutions.
Bleach & Harsh Cleaners
- Bleach appears to “kill” mold on surface, but it often fails to reach mold roots beneath porous surfaces.
- It may discolor surfaces, harm finish or paint, and emit strong fumes.
- Repeated use can degrade materials or create resistance.
Commercial Mold Removers
- Many use strong chemicals, fungicides, or volatile compounds
- They may be costly
- Some require ventilation and safety gear
- They often treat symptoms but fail to change environment (humidity, leaks), so mold returns
Physical Removal / Abrasion
- Scrubbing and sanding can remove visible mold—but aerosolize spores, spreading them
- It may damage surfaces, require containment
Doing Nothing / Cosmetic Coverups
- Painting over mold without treatment masks the problem and can trap moisture
- Ignoring it lets mold creep deeper
Thus, an ideal mold remedy is one that is effective, gentle on surfaces, safe for indoor use, affordable, and supports environmental control—exactly where the old trick shines.
4. The Grandmother’s Mold Trick: Vinegar + Baking Soda + Sunlight / Circulation
The classic old‑household remedy (used by grandmothers) combines vinegar, baking soda, and sunlight / airflow / warmth to make mold disappear. In many versions, the steps are:
- Apply white vinegar to moldy area
- Let it sit for some period (minutes to hours)
- Optionally sprinkle or scrub with baking soda
- Rinse or wipe
- Expose the cleaned surface to sunlight and good airflow so residual spores are dried or discouraged
This combination works surprisingly well on many indoor mold patches (especially early or surface mold) with minimal cost and harshness.
Why It Works: The Science Behind It
- Acidity of Vinegar: White vinegar is mildly acidic (pH ~2.5–3). Many molds are inhibited by acid environments. Vinegar can penetrate mold hyphae, lower pH, and disrupt growth.
- Physical Disruption & Abrasion: Baking soda (sodium bicarbonate) is mildly abrasive and helps mechanically dislodge mold and spores. It is alkaline and can also create an environment less hospitable to mold after cleaning.
- Sodium bicarbonate’s buffering: After vinegar, the baking soda can neutralize residual acidity, helping restore benign pH—less harsh to surfaces.
- Drying & UV / Sunlight / Airflow: Mold spores hate dry, UV‑exposed conditions. Once cleaned and dried, lingering spores desiccate or lose viability. Sunlight and circulating air (heat) help prevent regrowth.
- Residual effect: Vinegar sometimes leaves behind antimicrobial traces, and baking soda can continue acting as a mild moisture buffer (absorbing minor moisture).
So the trick is not magic—it’s combining a mild biocide (vinegar), mechanical removal (baking soda), and environmental control (drying + airflow) to disable mold and prevent recurrence.
5. Step‑By‑Step Guide: How to Use the Sponge Trick (Vinegar + Baking Soda Method) for Mold Removal
Here is a comprehensive protocol to try this method safely, thoroughly, and effectively.
Materials You’ll Need
- White vinegar (standard household strength, ~5%)
- Baking soda (sodium bicarbonate)
- Clean spray bottle
- Soft brush or sponge (dedicated for mold work)
- Microfiber cloths or rags
- Warm water in a bucket
- Protective gloves, possibly mask or goggles (for heavy mold)
- Towels or drop cloths to protect floor
- Access to sunlight / cross‑ventilation
Preparation & Safety
- Ventilate the area: Open windows, doors, bring in fresh air
- Move items away: Clear furniture, decor, items near mold area
- Protect surroundings: Lay towels or plastic sheeting under area
- Wear protective gear: Gloves, mask if mold load is heavy
- Test small area first: Especially if wall or surface is delicate or old
Application Procedure
- Spray vinegar
- Fill spray bottle with plain white vinegar
- Liberally spray the moldy surface (tiles, drywall, wood) until damp
- Let sit for 30 minutes to 1 hour (or more if thick mold)
- Baking soda scrub
- After vinegar dwell, sprinkle baking soda onto the area
- Use soft brush or sponge to gently scrub mold away—work in circular motion
- The reaction between vinegar and baking soda may bubble and help lift mold
- Rinse or wipe
- Use a cloth dampened in warm clean water to wipe down the surface
- Rinse with fresh water until residue is removed
- Dry immediately with a towel
- Dry thoroughly & expose to airflow / sunlight
- Keep windows open, run fans, or use a dehumidifier
- If possible, expose the cleaned surface to direct sunlight
- Ensure the cleaned area remains as dry as possible in the following 24–48 hours
- Repeat if needed
- If mold patches remain, repeat steps
- For heavy mold areas, multiple applications may be required
- Monitor for regrowth
- In days/weeks after, check whether mold tries to reappear
- If it returns, reapply or strengthen ventilation
If done right, many surface mold patches vanish or become greatly diminished.
6. Enhancements, Variations & Customization
To increase the power or adaptability of this trick, you can layer in these enhancements.
Enhanced Solutions / Additives
- Add a few drops of essential oils (tea tree, clove, eucalyptus) to vinegar spray—some have antifungal properties
- Use baking soda paste (baking soda + a bit of water) on stubborn patches after vinegar treatment
- Hydrogen peroxide (3%) can be used after baking soda/ vinegar to further oxidize persistent mold
- Use a spritz of alcohol (isopropyl) after cleaning to help disinfect
Targeting Porous Surfaces & Corners
- In crevices or seams, use a toothbrush or small detail brush
- For wood or drywall, ensure minimal soaking; don’t over-saturate or damage substrate
- For grout lines, mix stronger paste (baking soda) into tiles, let it act longer
Preventative Applications
- Occasionally spray diluted vinegar (1:1 with water) on suspect walls or corners to preempt mold
- Keep a small sponge soaked in mild vinegar in mold-prone closets for periodic wiping
- Use baking soda in drawers or cabinets as passive absorbent buffer
Click page 2 for more