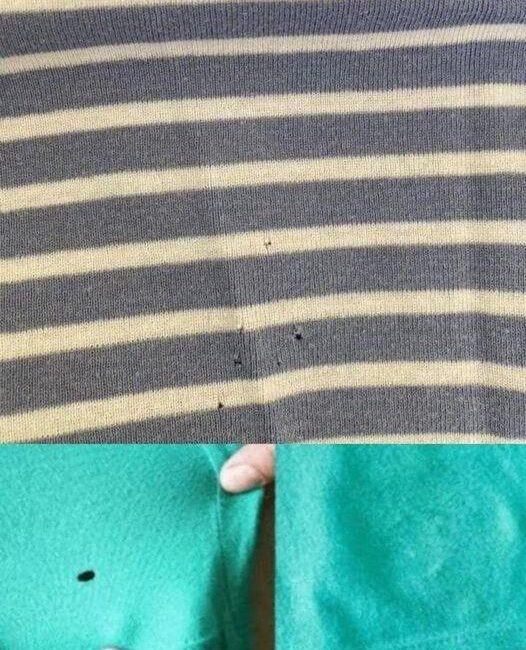
Have you ever found your favorite shirt or pair of jeans ruined by a pesky hole? Whether it’s caused by wear and tear, an accident, or simply time passing, holes in clothing can be frustrating. The immediate thought for many is, “I need to sew this up,” but what if you don’t have a needle, thread, or sewing skills? What if you could fix your clothes without sewing a single stitch?
Welcome to the ultimate No-Sew Hole Fixing Guide, your one-stop resource for repairing clothes quickly, cheaply, and without any stitching involved. This guide will teach you everything you need to know about mending your clothes using easy, innovative, and effective no-sew methods that anyone can master.
Why No-Sew Repairs Are a Game-Changer
Before diving into the techniques, let’s understand why no-sew repairs are such a fantastic option:
1. No Sewing Skills Required
Not everyone has the time, patience, or expertise to sew. No-sew fixes eliminate the need to thread needles, tie knots, or stitch carefully. If you can handle simple tools like scissors, glue, or an iron, you’re all set!
2. Fast and Convenient
Sewing can be time-consuming, especially for complicated tears or holes. No-sew methods are designed to be quick and efficient — you can repair your clothes in minutes.
3. Saves Money and Reduces Waste
Instead of tossing damaged clothes or paying for professional repairs, you can extend the life of your garments at home. This eco-friendly approach reduces textile waste and keeps your budget intact.
4. Versatility Across Fabrics
No-sew techniques work on many types of fabric — from denim jeans and cotton tees to synthetics and knits — making them incredibly versatile.
5. Perfect for All Ages and Skill Levels
Kids, teens, and adults can all learn and enjoy no-sew clothing repairs, promoting creativity and self-reliance.
Understanding Your Fabric and Damage Type
Before repairing, it’s important to know what kind of fabric you’re working with and the nature of the damage. This affects which no-sew method will be most effective.
Fabric Types to Consider
- Cotton and Cotton Blends: Common in t-shirts, shirts, and casual wear. Easy to work with.
- Denim: Heavyweight fabric, perfect for durable patches.
- Knits: Stretchy fabrics that require flexible repair options.
- Silk and Delicates: Fragile, so gentle methods are best.
- Synthetics (Polyester, Nylon): Heat-sensitive, avoid high temperatures or harsh adhesives.
Types of Damage
- Small Holes: Tiny pinholes or small rips that are easier to conceal.
- Medium Holes: Noticeable tears but still manageable with patches.
- Large Holes or Rips: Significant damage that may require layering or creative solutions.
Essential Tools and Materials for No-Sew Repairs
Here’s what you’ll need to start fixing your clothes without sewing:
- Fabric Glue: Designed specifically for textiles; dries flexible and clear.
- Iron-On Patches: Pre-cut or cut-to-size fabric patches with heat-activated adhesive.
- Fusible Webbing: Thin adhesive sheets or tape activated by heat, used to bond fabrics.
- Double-Sided Fabric Tape: Great for temporary fixes or delicate fabrics.
- Fabric Scraps: Pieces of fabric from old clothes or purchased material for patches.
- Scissors: For cutting patches and trimming frayed edges.
- Iron: For heat-activated adhesives.
- Pressing Cloth: To protect your fabric when ironing.
- Tweezers: Useful for working with small holes or delicate material.
- Optional: Decorative patches or appliques for stylish repairs.
The Top No-Sew Hole Fixing Methods: Step-by-Step
Let’s explore the best ways to fix holes without stitching, tailored to different fabrics and hole sizes.
1. Iron-On Patches: The Fast and Durable Fix
Best for: Medium to large holes on cotton, denim, and sturdy fabrics.
Materials:
- Iron-on patch
- Iron
- Pressing cloth
Steps:
- Trim the hole edges to remove any loose threads or fraying fabric.
- Cut your patch to be about half an inch larger than the hole on all sides.
- Place the patch adhesive-side down on the inside of the garment, covering the hole completely.
- Cover the patch with a pressing cloth to protect fabric.
- Set your iron to the appropriate temperature (usually medium heat, no steam).
- Press the iron firmly on the patch for 30-40 seconds, moving slightly to ensure even heat distribution.
- Allow the garment to cool completely before handling.
Tips: Use patches that match your fabric color for an invisible repair, or choose decorative ones to add personality.
2. Fabric Glue: Invisible and Flexible
Best for: Small holes and delicate or stretchy fabrics.
Materials:
- Fabric glue
- Matching fabric scrap or patch
Steps:
- Clean the area around the hole and trim any frayed threads.
- Cut a patch slightly larger than the hole.
- Apply a thin layer of fabric glue around the hole edges and on one side of the patch.
- Press the patch onto the inside or outside of the garment, covering the hole.
- Hold firmly and smooth out wrinkles or bubbles.
- Let the glue dry according to the instructions (usually several hours).
Tips: Avoid using regular craft glue; fabric glue remains flexible and clear when dry.
3. Fusible Webbing: Strong Heat-Bonded Repair
Best for: Medium to large holes, non-stretch fabrics.
Materials:
- Fusible webbing (sheet or tape)
- Fabric patch
- Iron
- Pressing cloth
Steps:
- Cut fusible webbing to match patch size, slightly smaller than patch edges.
- Place webbing on back of patch fabric.
- Iron the patch with webbing to bond the adhesive to the patch fabric (follow product instructions).
- Position patch over hole, adhesive side down.
- Cover with pressing cloth and iron until patch fuses to garment.
- Allow to cool before handling.
4. Double-Sided Fabric Tape: Quick Temporary Fix
Best for: Temporary repairs or delicate fabrics.
Materials:
- Double-sided fabric tape
- Small patch or fabric scrap
click page 2 to continue