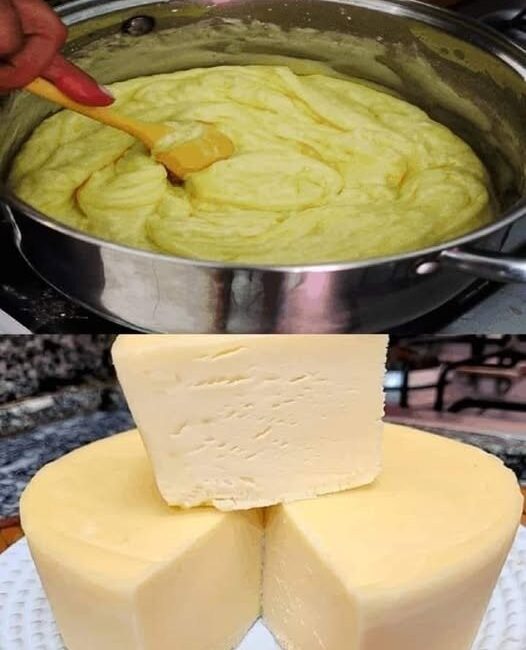
Step 5: Straining the Curds
Place a cheesecloth or a fine-mesh strainer over a large bowl and carefully pour the curds and whey mixture into it.
Let the whey drain naturally for 10 to 15 minutes. For firmer cheese, gather the cheesecloth edges and gently squeeze out excess liquid.
Step 6: Seasoning and Flavoring
Transfer the curds to a mixing bowl. Add salt to taste (typically about 1 teaspoon, but adjust according to preference).
Slowly mix in 50 grams of melted butter. The butter enriches the cheese, giving it a creamy texture and a luscious mouthfeel.
Finally, stir in 1 tablespoon of Provencal herbs. The blend of thyme, oregano, rosemary, and basil lends the cheese a delightful herbal aroma and taste, elevating its flavor profile.
Step 7: Shaping and Storing
Form the cheese into a ball or block using your hands or the cheesecloth.
Store the cheese in an airtight container in the refrigerator. Homemade cheese is best consumed within 5 days to enjoy its freshness and flavor.
Tips for Perfect Homemade Cheese Every Time
- Milk quality matters: The better the milk, the better the cheese. Opt for fresh, whole milk with no additives.
- Temperature control: Don’t let the milk boil; overheating can affect texture.
- Vinegar type: Apple cider vinegar gives a pleasant flavor, but white vinegar can be used in a pinch.
- Drain well: The longer you drain, the firmer your cheese will be.
- Experiment with herbs: Try adding garlic powder, chives, dill, or paprika for different flavor variations.
Variations and Creative Twists
Herb-Infused Cheese
Enhance the basic recipe by mixing fresh herbs like chives, parsley, or tarragon into the cheese before shaping. Fresh herbs add a burst of color and complexity.
Spicy Cheese
Add a pinch of chili flakes or finely chopped jalapeño peppers to give the cheese a gentle kick that pairs wonderfully with creamy textures.
Garlic and Onion Cheese
Infuse the melted butter with garlic or onion powder before mixing it into the cheese. This simple addition adds depth and a savory punch.
Lemon Zest or Citrus
Add lemon zest or a few drops of lemon juice along with vinegar for a bright, fresh tang that balances the richness.
Nutritional Benefits of Homemade Cheese
Homemade cheese made with vinegar and milk is not only delicious but also nutritious:
- Rich in protein: Cheese provides a high-quality source of protein, essential for muscle repair and growth.
- Calcium powerhouse: Cheese is an excellent source of calcium, crucial for bone health.
- No preservatives or additives: Homemade cheese avoids artificial preservatives, stabilizers, or flavor enhancers found in many store-bought options.
- Customizable fat content: Using different types of milk (whole, 2%, or skim) allows you to control the fat content.
- Probiotic potential: If using raw or cultured milk, homemade cheese may contain beneficial bacteria for gut health.
Common Questions About Homemade Vinegar Cheese
Can I Use Non-Dairy Milk?
Unfortunately, non-dairy milks like almond, soy, or oat milk lack the casein protein necessary for coagulation, so this method won’t work.
How Long Does Homemade Cheese Last?
Fresh cheese should be eaten within 3 to 5 days for optimal flavor and safety. Keep it refrigerated in a sealed container.
What Can I Do With the Leftover Whey?
Don’t throw away the whey! It’s a nutrient-rich liquid perfect for:
- Adding to smoothies for extra protein.
- Using as a base for soups or stews.
- Incorporating into bread dough for enhanced flavor and texture.
Delicious Ways to Enjoy Your Homemade Cheese
Spread It
Homemade cheese has a creamy, spreadable consistency, perfect for smearing on crackers, toasted bread, or bagels.
Add to Salads
Crumbled over fresh greens, this cheese adds a tangy, rich element to salads.
Use in Sandwiches and Wraps
Layer it in sandwiches or wraps with fresh veggies and cured meats for a gourmet twist.
Incorporate into Pasta Dishes
Melt it gently into pasta sauces for creaminess without overpowering other flavors.
Bake It
Use it as a filling for savory pastries, stuffed mushrooms, or as a topping on casseroles.
The Cost Savings of Making Cheese at Home
Buying artisan or specialty cheeses can be expensive, especially when compared to the cost of the simple ingredients for homemade cheese.
- Milk: A liter of quality milk costs a fraction of pre-made cheese.
- Vinegar and herbs: These are pantry staples that last a long time.
- Butter: Adds richness but can be adjusted or omitted if desired.
By making cheese at home, you not only save money but also reduce waste and have full control over ingredient quality and flavor.
Final Thoughts: Embrace the Joy of Homemade Cheese
Making cheese at home with just milk and vinegar is a simple, rewarding process that opens the door to a world of culinary creativity. Beyond just the money-saving aspect, it reconnects you with the origins of food, turning a few basic ingredients into something special and wholesome.
Whether you enjoy it fresh, seasoned with herbs, or incorporated into your favorite dishes, homemade vinegar cheese offers a taste and texture you’ll struggle to find in store-bought alternatives.
By embracing this method, you not only enrich your meals but also gain a deeper appreciation for the craft of food preparation. So next time you think about buying cheese, remember: you’ve got everything you need to make something incredibly delicious right in your kitchen.