In an age where convenience food dominates our grocery lists, few things are as satisfying—and surprisingly easy—as making your own cheese at home. If you’ve ever glanced at the cheese aisle and wondered if there’s a simpler, fresher, and more natural way to enjoy this dairy delight, you’re in for a treat.
With just a few simple ingredients—milk, vinegar, salt, butter, and some fragrant Provencal herbs—you can transform ordinary milk into a creamy, tangy, and utterly delicious homemade cheese. This not only saves you money but also gives you control over the quality, freshness, and flavor of the cheese you consume.
This guide dives deep into the art and science of homemade cheese-making using vinegar as a coagulant. Whether you’re a culinary novice or an experienced cook seeking a new kitchen project, this method offers an accessible and rewarding experience.
The Magic Behind Homemade Cheese: Why Vinegar Works
Before we plunge into the practical steps, it’s worth understanding the simple science that makes this transformation possible.
Milk is an emulsion, a complex mixture of water, proteins, fats, sugars, and minerals. The two main proteins involved in cheese-making are casein and whey proteins. Casein molecules are naturally suspended in the milk in tiny clusters called micelles, kept apart by a stable pH and calcium ions. To make cheese, the casein proteins must coagulate—basically, clump together to form curds.
How Vinegar Acts as a Coagulant
Vinegar, especially apple cider vinegar, is acidic. When you add it to warm milk, the acid lowers the pH, disrupting the electrical charge around casein micelles. This causes the proteins to coagulate and separate from the liquid, forming solid curds and leaving behind the watery whey.
This process is similar to traditional cheese-making techniques that use rennet (an enzyme) or bacterial cultures, but vinegar offers a fast, simple, and vegetarian-friendly alternative. It’s ideal for making fresh cheeses like paneer, ricotta, or farmer’s cheese right at home.
Ingredients for Homemade Vinegar Cheese
To make this wonderfully creamy and flavorful cheese, you’ll need:
- 1.5 liters (6 1/3 cups) of whole milk: For the best results, use fresh, high-quality milk. Whole milk provides the necessary fat for a rich texture. Avoid ultra-pasteurized milk because it doesn’t coagulate well.
- 2 tablespoons (30 ml) of apple cider vinegar: This natural acid initiates curdling and imparts a slight fruity tang.
- Salt, to taste: Salt is essential, both for flavor and for preserving the cheese.
- 50 grams (1/4 cup) of melted butter: Adds richness and a silky mouthfeel.
- 1 tablespoon (15 ml) of Provencal herbs: A fragrant mix of herbs like thyme, rosemary, oregano, and basil, enhancing the flavor and making the cheese aromatic.
Step-by-Step Guide: How to Make Your Own Cheese with Vinegar and Milk
Step 1: Prepare Your Workspace and Equipment
Before you begin, make sure you have:
- A large, heavy-bottomed pot for heating the milk evenly.
- A fine mesh strainer or cheesecloth for draining whey.
- A large bowl to catch the whey.
- A wooden spoon or heat-resistant spatula.
- A thermometer (optional but helpful).
- A bowl for mixing melted butter and herbs.
Step 2: Heating the Milk
Pour the milk into your pot and slowly heat it over medium heat. Stir occasionally to prevent the milk from scorching or sticking to the bottom.
Heat the milk to around 85°C (185°F) — just below boiling. At this temperature, milk is hot enough to react well with the vinegar but not so hot as to scald or break down the fats undesirably. Use a thermometer if possible for precision.
Step 3: Adding Vinegar to Milk
Once the milk reaches the target temperature, remove the pot from heat. Slowly add 2 tablespoons of apple cider vinegar while gently stirring.
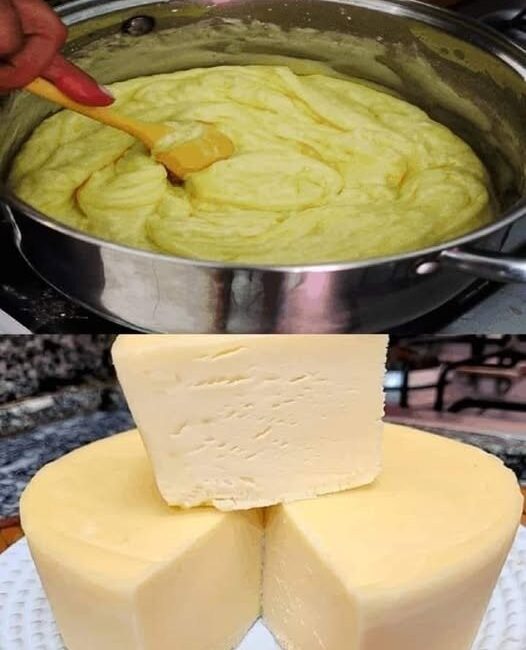
You will immediately notice the milk curdling—solid white curds will separate from the translucent, yellowish whey. This reaction typically happens within a few minutes. If curds don’t form, add a bit more vinegar (1 teaspoon at a time) until curds appear.
Step 4: Let the Curds Settle
Allow the curds and whey to sit undisturbed for 5 to 10 minutes. This resting period allows the curds to firm up and the whey to separate fully.
Click page 2 for more