Growing your own lemon plant at home is an incredibly rewarding pastime that provides fresh zest for your kitchen, boosts air quality, and adds a burst of greenery to your indoor or outdoor space. While most gardeners start from seeds or bought saplings, here’s a surprisingly simple and effective alternative: growing a lemon plant from a healthy leaf. This method is accessible, sustainable, and ideal for both urban growers and backyard lovers.
In this comprehensive guide, we’ll explore:
- Why leaf cuttings with a bud are effective for lemon propagation
- Step-by-step instructions, from selecting a leaf to harvesting your first lemons
- Optimal conditions for root development, growth, and plant health
- Expert tips on soil, nutrients, watering, pruning, and pest control
- Troubleshooting advice and common mistakes to avoid
- Propagation techniques, repotting, seasonal care, and more
By the end, you’ll confidently grow your own lemon plant from a simple leaf cutting—and enjoy the satisfaction of nurturing a thriving fruit tree from scratch.
Table of Contents
- 🍃 Why Grow a Lemon Plant from a Leaf Cutting?
- Understanding Lemon Plant Biology & Propagation Basics
- Step 1: Selecting the Ideal Leaf Cutting
- Step 2: Preparing the Cutting for Root Initiation
- Step 3: Rooting Medium & Container Setup
- Step 4: Root Growth and Care
- Step 5: Transplanting into Pot or Garden
- Optimal Soil, Light & Temperature Requirements
- Consistent Watering, Drainage, and Fertilization
- Humidity, Air Circulation & Microclimates
- Pruning, Training & Growth Management
- Common Pests and Natural Solutions
- Disease Diagnosis and Prevention
- Harvesting Lemons & Promoting Fruit Development
- Seasonal Care: Winter Protection & Summer Needs
- Propagating Additional Cuttings & Scaling Up
- Troubleshooting Common Issues
- Advanced Tips for Productive Citrus Cultivation
- Health Benefits & Environmental Impact
- Summary Table & Step-by‑Step Action Plan
1. 🍃 Why Grow a Lemon Plant from a Leaf Cutting?
Thousands of gardeners are turning to leaf—and especially leaf-with-bud—cuttings for citrus propagation because:
- High Success Rate: When done right, about 70–90% of leaf cuttings develop roots.
- Budget-Friendly: You only need one healthy leaf—you don’t buy nursery plants.
- Faster Fruit Production: Leaf cuttings already hold mature tissue, reducing the juvenile phase.
- Versatile for Small Spaces: Grow in containers on balconies or indoor windowsills.
- Sustainable: Enables sharing plants and conserving genetic strains.
This method is ideal for urban dwellers, eco-conscious gardeners, and anyone seeking a rewarding, low-cost gardening project.
2. Understanding Lemon Plant Biology & Propagation Basics
A. Botanical Background
Lemons (Citrus limon) are edible citrus trees known for their fragrant flowers and nutrient-rich fruit. They contain compounds like limonene, making them valuable both in the kitchen and in DIY household care.
B. Propagation Options
- Seed: Unpredictable fruit quality and long juvenile period (4–7 years).
- Grafting: Ensures true-to-type traits but requires horticultural technique.
- Softwood or leaf cuttings: Fastest vegetative method with potential for fruit in 2–3 years.
Leaf cuttings rely on:
- Meristematic activity within leaves and buds
- Development of adventitious roots
- Encouraging secondary growth from the leaf’s axillary bud
By using a leaf cutting with a nodal bud and hormonal support, you streamline successful citrus propagation.
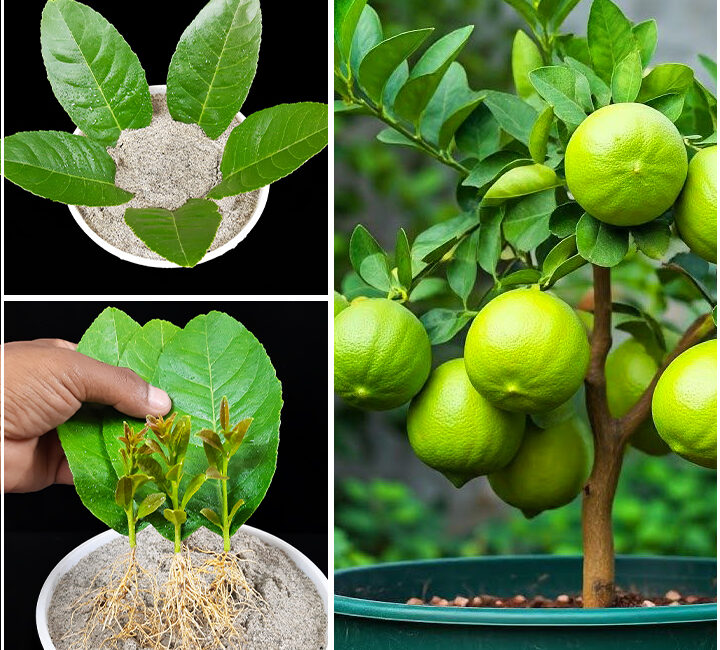
3. Step 1: Selecting the Ideal Leaf Cutting 🌱
What to Look For
- Age: Choose young, partially matured leaves—3–6 months old. Old leaves resist rooting.
- Health: Bright, blemish-free, free of pests
- Bud presence: Leaves attached to a small branch with a node have the highest success rate
Best Time to Take Cuttings
Spring to early summer, when the plant is actively growing and hormones are highest.
Sterilization & Cutting Technique
- Sanitize tools to prevent disease
- Cut at a 45° angle just below a node with a sharp blade
- Aim for 10–15 cm length, including a primary leaf and node
4. Step 2: Preparing the Cutting for Root Initiation
Trim & Clean
- Remove extra leaves, keeping 2–3 for photosynthesis
- Create a clean base cut and optionally scrape bark slightly to expose internal tissue (optional)
Hormone Dip (Optional but Effective)
- Use commercial root-stimulating hormone (IAA/IBA 0.3–0.5%)
- Dip within 2 mm of the cut end to encourage rapid rooting
Pre-Soak
Some gardeners lightly soak the base in water for 30 minutes to trigger cell activation.
5. Step 3: Rooting Medium & Container Setup
Choosing the Medium
- Equal mix of peat moss and perlite, or coconut coir and perlite, ensures good moisture and aeration
Container Specs
- Use 6–10 cm cups or small pots with drainage holes
- Always start in small pots to promote rooting
Planting Process
- Insert the cut section 1–2 cm into moist medium
- Firm gently to remove air pockets
- Label each pot with date and source variety
Covering and Environment
- Use a clear plastic dome or sealed bag to maintain ~80–90% humidity
- Keep out of direct sunlight
6. Step 4: Root Growth and Care
Ideal Conditions
- Temperatures at 24–28 °C
- Light: bright but indirect
Watering & Mist Routine
- Keep medium evenly moist, not soggy
- Mist daily to rejuvenate humidity, maintaining humidity dome
Monitoring Progress
- Expect root primordia within 4–6 weeks
- A light tug can indicate root formation
Ventilation
- After root emergence: vent gradually to accustom roots to less humidity
7. Step 5: Transplanting into Pot or Garden
Once roots reach 3–5 cm:
Potting Options
- 15‑30 cm pot with peat-based potting mix and perlite
- Include compost or slow-release citrus fertilizer
Transplant Steps
- Remove from early pot, gently expand root ball
- Center in new pot, firm soil gently
- Water to settle and prevent shock
Growth Support
- Stake if the young stem is floppy
- Resume misting lightly for gentle acclimation
8. Optimal Soil, Light & Temperature Requirements
Soil Composition
- Well-draining blend of compost, peat moss, perlite; pH 6.0–7.0
Light Exposure
- 6–8 hours of morning sun is ideal
- Indoors, use bright southeast windows or supplemental LEDs
Temperature Needs
- Best range: 20–30 °C day / 15–20 °C night
- Protect from frost below 5 °C
9. Consistent Watering, Drainage & Fertilization
Watering Tips
- Water thoroughly until it drains, then allow top 2 cm to dry
- Adjust in summer or cold winter
- Use filtered or rainwater to prevent mineral buildup
Fertilization Schedule
- First year: light feeding with balanced N-P-K fertilizer monthly
- After 12–18 months: switch to citrus-specific fertilizer high in magnesium and trace minerals
Mulching & Soil Health
- Mulch with compost or bark chips to retain moisture and suppress weeds
Click page 2 for more