Introduction
Building a pallet tipi in your garden is a creative, eco-friendly, and welcoming project. It’s the dream setup to offer children—or even adults!—a cozy, original, and charming little sanctuary. But to ensure this small structure brings joy, comfort, and lasting value, you need to avoid some common pitfalls. In this article, we’ll walk through the 5 major mistakes to avoid at all costs when installing your pallet tipi to make it stable, durable, and truly enjoyable:
- Neglecting the safety of fastenings 🔩
- Forgetting protection against moisture 💧
- Underestimating the importance of comfort 🛏️
- Setting up the structure on an unsuitable surface 🏡
- Skipping decoration and personalization 🎀
1. Neglecting the Safety of Fastenings 🔩
a) Why It Matters
The integrity and safety of your tipi depend entirely on how well the pallets and planks are assembled. Using pallets without proper reinforcements, or screwing things together hastily, can lead to multiple risks: collapse, loose boards, and potential injuries.
b) Choosing the Right Screws, Brackets, and Reinforcements
- Stainless steel or galvanized screws resist rust and weathering.
- Proper length: screws should pass through one plank and penetrate at least 5 cm into the adjacent one.
- Metal brackets at corners are essential for stiffening the structure.
- Internal wooden struts help prevent roof boards from sagging.
c) Thorough Inspection
Before moving on, ensure that:
- Every screw is tightly secured.
- No board shifts or creaks.
- There are no weak spots in the structure.
2. Forgetting Protection Against Moisture 💧
a) The Perils of Water
Exposure to rain, dew, ground moisture, and other water sources can cause:
- Wood rot
- Warping of boards
- Mold growth
- Overall deterioration
b) Proper Preparation & Treatment
- Sanding first: eliminate splinters and rough edges.
- Apply protective finish: two coats of exterior stain, varnish, or water-repellent are recommended.
- Under-structure membrane: use geotextile or plastic film beneath the base.
- Annual maintenance: inspect and reapply finishes each year.
c) Ground Drainage
Make sure the area drains well. Consider adding a trench or small gutter to divert water away from the structure.
3. Underestimating the Importance of Comfort 🛏️
A tipi is meant for relaxation—without comfort, you lose the cozy vibe.
a) Choosing Cushions and Mattresses
- A thick mattress (10–15 cm) ensures good support for lounging or napping.
- Large, plush floor cushions provide that cushy, immersive feel.
- A soft rug adds insulation and warmth, especially in cooler weather.
b) Durable Fabrics & Removable Covers
- Opt for outdoor-grade or washable textiles (cotton blends with weather resistance).
- Fleece or faux-fur throws add an ultra-cozy touch.
c) Clever Storage Solutions
Integrate a small toy chest, fabric basket, or wall-hung pocket organizer for soft toys, books, or games.
d) Temperature Control & Ventilation
- Add air vents by spacing roof boards or adding a small window.
- For extra insulation, consider a velvet curtain or thick canvas drape to stifle drafts.
4. Installing on an Unsuitable Surface 🏡
a) Why the Base Matters
The foundation affects stability and the longevity of the wood structure.
b) Loose Dirt vs Stable Ground
- Bare dirt can shift and hold moisture—unstable and problematic.
- Well-drained grass works well if it’s not in a depression.
- Paving slabs, patio, or decking offer a firm, long-lasting surface.
c) Ground Preparation Tips
- Leveling is crucial for a straight build.
- A layer of gravel or sand enhances drainage.
- Adjustable deck supports (plastic or metal) help with slight slopes.
d) Floor Insulation
Build a raised wooden floor on supports, and lay plastic film underneath to separate it from the ground moisture.
5. Skipping Decoration & Personalization 🎀
Without small personal touches, your tipi can feel bare. Yet decoration is what breathes life into it and sparks imagination!
a) Soft, Ambient Lighting
- LED string lights, flameless candles, or solar lanterns create a warm atmosphere.
- Choose waterproof options (IP44 or higher).
b) Colorful Textiles
- Mix pastel tones, tribal prints, or geometric patterns.
- Add a statement cushion, oversized and themed to anchor the space.
- A play rug can become a designer focal point.
c) Handmade Crafts & Hanging Accents
From macramé pieces and dreamcatchers to fabric pennants, these tactile additions are perfect for littles to explore and enjoy.
d) Creative Zone Within
- A fold-away wall shelf can serve for snacks, art, or playtime.
- A chalkboard panel adds versatility—perfect for drawing or little signs.
e) Panel Customization
Encourage creativity with:
- Chalk paint sections to doodle on.
- Stickers or stencils for decorating walls.
- Miniature ladders, decorative clocks—anything fun!
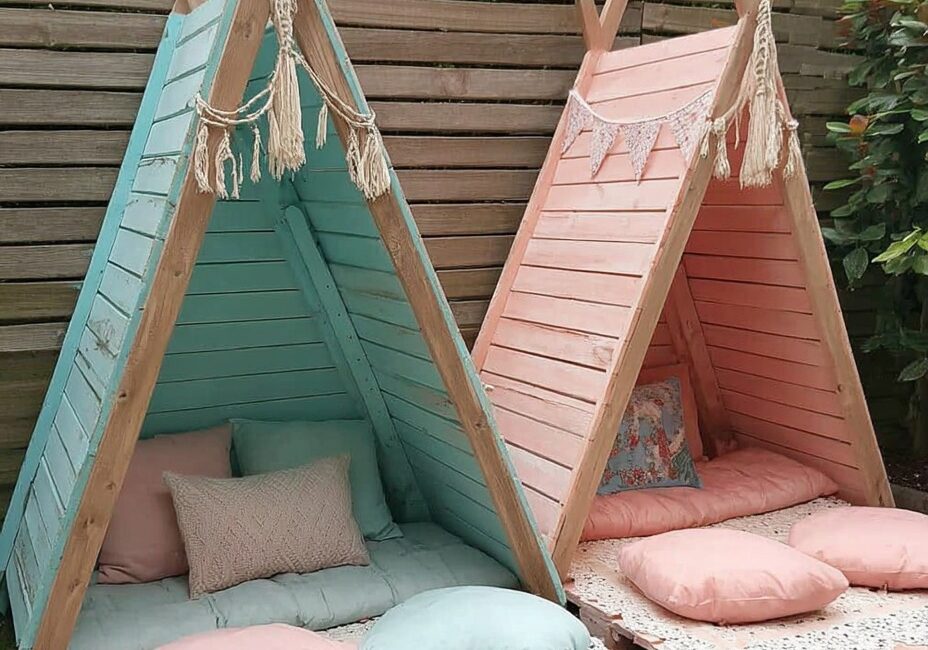
Case Study: A Chic-Boho Pallet Tipi
Let’s visualize a well-executed final project:
🏞️ Structure & Fastening
- A 2 m x 2 m square base.
- Six dismantled pallets used as posts.
- Stainless steel screws (8×70 mm) and galvanized steel brackets.
- Cross-beams at the top with four interior struts for reinforcement.
💧 Moisture Protection
Click page 2 for more