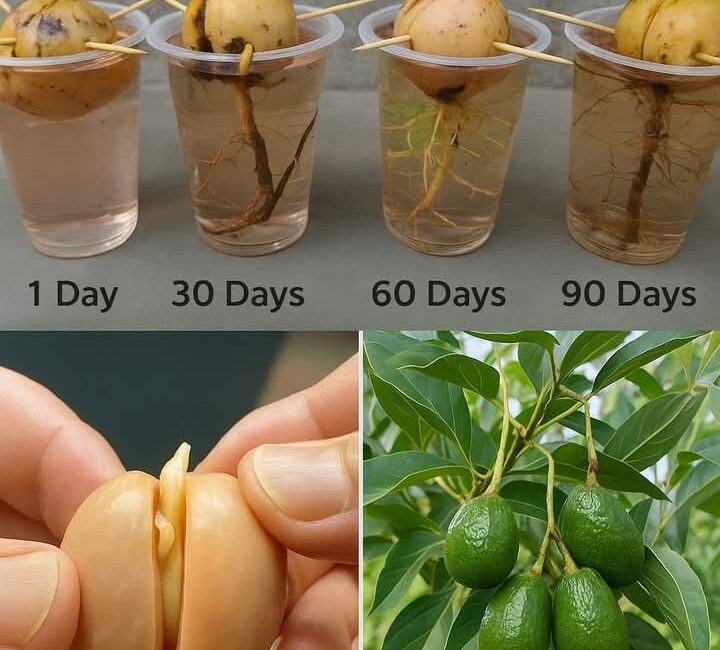
Avocados have soared in popularity in recent years, thanks to their creamy texture, rich nutritional profile, and culinary versatility. Many people enjoy guacamole, avocado toast, and salads featuring this superfood, but did you know that you can easily grow your own avocado tree right at home from the simple pit inside the fruit?
Growing an avocado tree from a pit is a rewarding and educational project for gardeners, hobbyists, and anyone who loves to cultivate their own fresh produce. This step-by-step guide will walk you through the easiest and most effective method to sprout an avocado seed, nurture it, and eventually transplant it into a thriving indoor or outdoor plant.
Whether you live in a tropical climate or a temperate zone, this guide covers everything you need to know — from preparing the pit to transplanting, caring for your avocado tree, and troubleshooting common problems. By following these detailed instructions, you’ll be on your way to harvesting fresh avocados in just a few years.
Why Grow an Avocado Tree from a Pit?
Before diving into the how-to, it’s worth understanding the benefits and appeal of growing your own avocado tree.
- Cost-effective: Growing from a pit is essentially free, making it an economical way to produce a fruit tree.
- Sustainability: Growing your own avocados reduces the environmental footprint of store-bought fruit, which often requires long-distance shipping.
- Gardening enjoyment: Watching a seed germinate and develop into a tree is a gratifying experience that connects you with nature.
- Health benefits: Avocados are packed with heart-healthy fats, fiber, vitamins, and minerals.
- Customization: You can experiment with different avocado varieties by using pits from Hass, Bacon, Fuerte, or other types.
Step 1: Prepare the Avocado Pit for Germination
The first crucial step is to extract and prepare the pit properly to maximize your chances of successful germination.
Selecting a Quality Avocado
Start with a ripe, fresh avocado from your local grocery store or farmer’s market. The pit inside should be large, intact, and free from cracks or damage.
Cleaning the Pit
Carefully slice the avocado open and remove the pit without cutting or damaging it. Rinse the pit thoroughly under lukewarm water, removing all clinging avocado flesh, which can promote mold growth or bacterial contamination.
Drying the Pit
Pat the pit dry with a clean cloth or paper towel. Let it air dry for a few minutes to remove surface moisture.
Toothpick Placement
Insert 3 to 4 toothpicks evenly spaced around the middle of the avocado pit, angled slightly downward. These toothpicks act as supports to suspend the pit in water without letting it fall in completely.
Step 2: Suspend the Pit in Water
This is the iconic step where you place the avocado pit so that the bottom half is submerged in water while the toothpicks rest on the rim of a glass or jar.
Choosing the Right Container
Select a clear glass or jar to hold water. Transparency helps you monitor root growth and water clarity.
Positioning the Pit
Place the avocado pit toothpick-side down on the rim, ensuring the broad end (the bottom) is submerged approximately 1 to 2 inches in water. The pointed end (top) should face upward and remain above water.
Step 3: Maintain Fresh Water and Monitor Growth
Change Water Regularly
Replace the water every 2 to 3 days to prevent bacterial or fungal buildup that can rot the seed. Fresh water oxygenates the seed and encourages healthy root development.
Monitor for Mold or Rot
If you see any fuzzy mold or discoloration on the seed, rinse it thoroughly, remove any mold, and replace the water more frequently.
Step 4: Wait for Germination: Be Patient!
Avocado pits take time to sprout roots and shoots. Typically, germination occurs within 2 to 6 weeks, but it can sometimes take longer depending on temperature and seed condition.
Signs of Germination
- A crack appears at the bottom (broad end) of the pit.
- White, string-like roots start emerging from the crack.
- Eventually, a green shoot or stem will grow from the top.
Optimal Conditions for Germination
- Keep the jar in a warm, sunny location such as a windowsill with indirect sunlight.
- Avoid direct harsh sunlight which can overheat the seed.
- Maintain room temperature ideally between 65°F and 85°F (18°C to 29°C).
Step 5: Transplant the Seedling into Soil
Once your avocado pit has a well-developed root system (about 3 to 4 inches long) and a healthy stem with leaves (around 6 inches tall), it’s time to plant it in soil.
Selecting a Pot and Soil
- Use a pot with drainage holes to prevent waterlogging.
- Choose a well-draining potting mix rich in organic matter. A mix formulated for citrus or succulents works well.
Planting Technique
- Fill the pot with soil, creating a small mound in the center.
- Place the seedling so that the bottom roots are buried, but leave the top half of the pit exposed above the soil.
- Firm the soil gently around the seedling to stabilize it.
Click page 2 for more


