Step 2: Tape Off the Work Area
Apply painter’s tape to the surfaces above and below the caulk line. This creates a neat boundary and ensures a professional-looking edge when you’re done.
Leave a gap the width of your new bead of caulk—usually about 1/8 inch to 1/4 inch wide.
Step 3: Apply the New Caulk
- Cut the tip of your silicone caulk tube at a 45° angle.
- Apply a thin, even bead directly over the cracked area. Make sure the new caulk sinks into the cracks and fills any small gaps.
- Work in small sections (2 to 3 feet at a time) to avoid the caulk drying before smoothing.
Pro Tip: Apply consistent pressure to the tube and move steadily for a clean bead.
Step 4: Smooth the Caulk
Immediately after applying the caulk:
- Wet your finger or use a caulk smoothing tool to press and smooth the bead.
- Glide over the bead in one continuous motion to create a clean seal.
- Wipe excess caulk onto a paper towel or rag as you go.
Remove the painter’s tape before the caulk begins to skin over (usually within 5-10 minutes).
Step 5: Allow the Caulk to Cure
Let the caulk dry completely according to the manufacturer’s instructions—typically 24 hours for full cure.
Avoid getting the area wet during this time.
Why This Method Works
Unlike full removal, which requires scraping, dissolving old caulk, and thoroughly resealing from scratch, this overlay method is quicker, cleaner, and highly effective when:
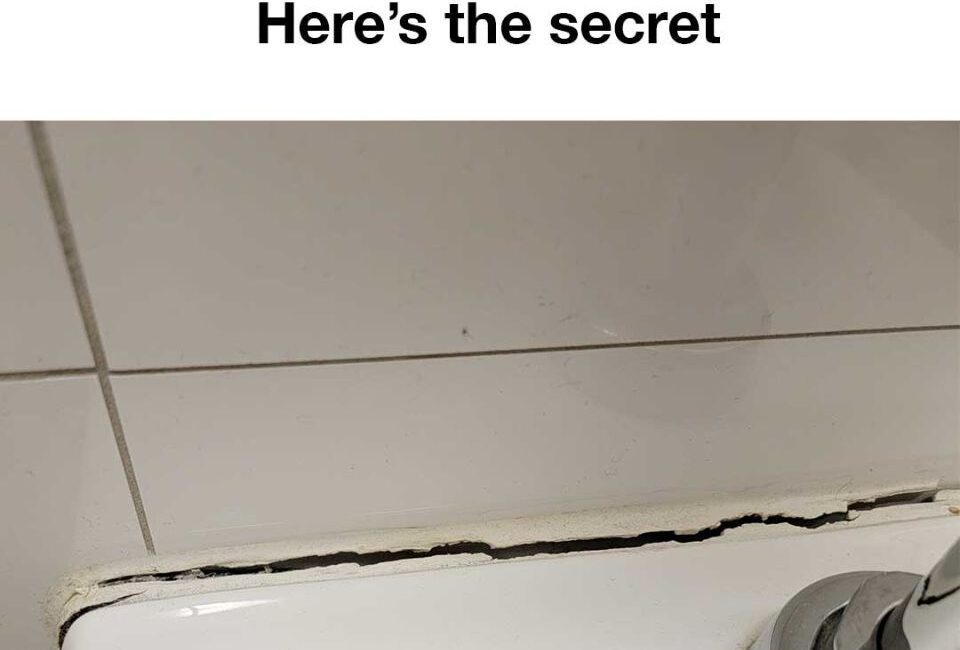
- The old caulk is only cracked, not peeling or moldy
- The substrate (tub, tile, wall) is in good condition
- You’re short on time or doing a preventative refresh
Silicone caulk bonds well to itself, as long as the surface is clean and dry. The new bead bridges cracks, creating a new watertight barrier.
Common Mistakes to Avoid
- Not cleaning thoroughly: Oil, soap, and mold prevent adhesion.
- Skipping the tape: Your bead will look sloppy without masking the edges.
- Using the wrong caulk: Acrylic caulk shrinks and degrades quickly in wet areas.
- Applying too much caulk: Thick beads take longer to cure and may not bond well.
- Not smoothing immediately: Silicone skins over fast—delay ruins the finish.
When Should You Remove Old Caulk Instead?
Sometimes, overlaying isn’t enough. If you notice any of the following, remove the old caulk entirely:
- Mold or mildew inside or behind the caulk
- Peeling, lifting, or detached caulk
- Multiple overlapping old repairs
- Water damage behind the caulk line
To remove caulk, use a utility knife, caulk remover tool, or commercial caulk softener.
How to Prevent Caulking Cracks in the Future
- Dry the bathroom after showers: Use a towel or squeegee to remove moisture from tiles and joints.
- Ventilate the room: Run the exhaust fan or open a window during and after showers.
- Use high-quality, flexible silicone caulk: It lasts longer and resists mildew.
- Avoid excessive movement: Tighten loose fixtures and reseal gaps as soon as you spot them.
- Inspect your caulking quarterly: A five-minute check can prevent major repairs.
Maintenance Tips for a Mold-Free, Sealed Bathroom
- Wipe down your caulking lines weekly with a diluted vinegar solution.
- Reapply caulk every 3–5 years or as needed.
- Repair minor cracks at the first sign instead of waiting.
- Use mold-resistant paint and sealants throughout your bathroom.
Final Thoughts
Fixing cracked bathroom caulking doesn’t have to be a weekend-consuming project. With a few basic tools and a solid method—like the one my dad shared—you can refresh the caulk quickly and effectively without stripping it away entirely. This approach is perfect for homeowners, renters, or anyone who wants to maintain their bathroom’s appearance and integrity with minimal hassle.
The key is preparation: clean thoroughly, apply evenly, and allow the sealant to cure properly. Done correctly, this repair can extend your bathroom caulking’s lifespan by years, prevent water damage, and give your space a clean, polished look.
So next time you notice a crack in the caulking around your tub or sink, don’t panic. With this DIY method, you’ve got everything you need to fix it fast—and fix it right.