Bathroom maintenance often ranks high on the list of dreaded household chores. Whether it’s battling mold in the corners or scrubbing soap scum off the tiles, the bathroom requires regular attention. One of the most common issues that plagues bathrooms is cracked caulking. These small but unsightly lines can seem like a minor cosmetic flaw, but they can lead to major problems if left untreated. Water seepage, mold growth, and eventual damage to walls and flooring are just some of the consequences.
Fortunately, you don’t have to be a professional contractor—or even remove the old caulk—to repair cracked bathroom caulking effectively. With a few supplies, some preparation, and a technique passed down from my dad (a lifelong DIY enthusiast), you can fix cracked caulk in just a few hours and extend the life of your bathroom’s sealant for years.
This article walks you through the importance of maintaining caulking, what causes it to crack, what materials you’ll need, and a step-by-step breakdown of how to repair it without removing the old caulk entirely. It also includes expert-level tips and maintenance strategies so you can keep your bathroom looking like new.
Understanding the Problem with Cracked Caulking
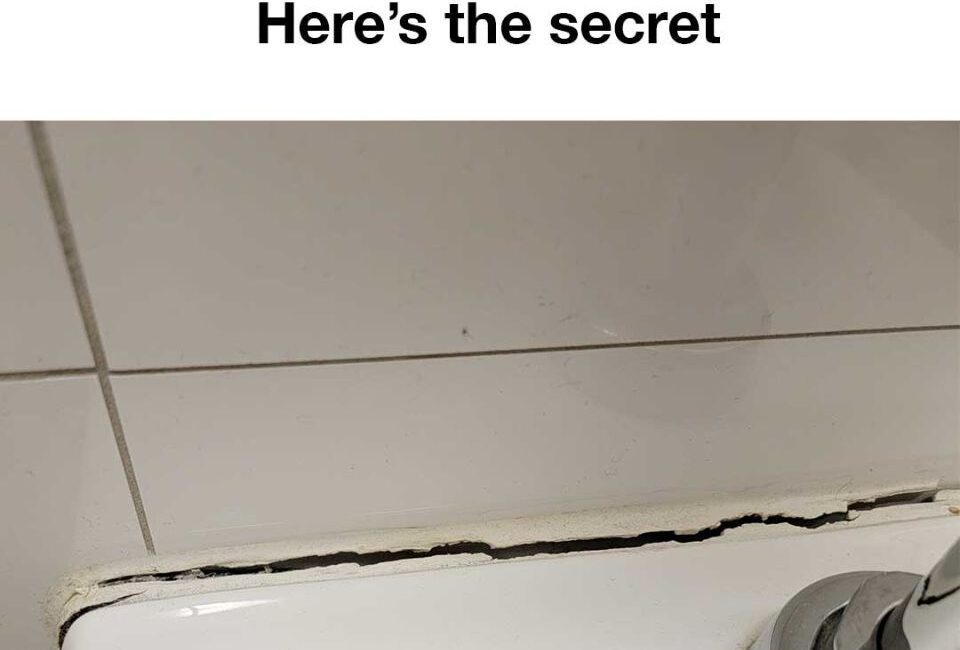
Cracked caulking occurs when the flexible sealant between tiles, tubs, sinks, and walls begins to deteriorate. In bathrooms, caulking is essential for preventing water from seeping behind tiles or into joints between the bathtub and wall. When it cracks, the seal is broken.
What causes caulking to crack?
- Age: Over time, caulking naturally loses its elasticity and adhesive power.
- Moisture: Constant exposure to humidity softens and degrades the caulk.
- Improper application: Applying caulk over a dirty, wet, or soapy surface reduces adhesion.
- Temperature fluctuations: Hot showers, cold tiles, and heating vents cause the materials to expand and contract, stressing the caulk.
- Movement of surfaces: If your bathtub or sink shifts slightly with use (which is common), it puts stress on the caulk line.
Why Fixing Cracked Caulking Matters
Many people ignore cracked caulking until they notice mold, mildew, or even leaks. But by then, the damage may already be extensive. A simple hairline crack can allow water to seep behind your tiles or under your tub. This moisture not only feeds mold but can also rot the wallboard, weaken flooring supports, and cause unpleasant odors.
Fixing cracked caulking early prevents:
- Mold and mildew buildup
- Water damage to drywall, studs, and subflooring
- Structural issues
- Unsightly, aged appearance of your bathroom
Materials and Tools You’ll Need
This repair technique is designed to overlay new caulk on top of cracked (but still attached) existing caulk. It’s a faster and cleaner method than full removal.
Basic Supplies:
- Silicone bathroom caulk (mold and mildew resistant, ideally in the same color as the old caulk)
- Utility knife or razor blade
- Rubbing alcohol or vinegar
- Clean cloth or paper towels
- Caulking gun (if not using a squeeze tube)
- Caulk smoothing tool (or plastic spoon)
- Painter’s tape
- Hairdryer (optional, for drying damp surfaces)
Why Silicone Caulk?
Silicone is more flexible and longer-lasting than acrylic latex. It’s water-resistant, adheres well to tile and tub surfaces, and withstands frequent exposure to moisture and heat.
Step-by-Step Guide to Fixing Cracked Bathroom Caulking Without Removing It
Step 1: Clean the Surface Thoroughly
Before you apply new caulk, it’s crucial to clean the existing caulk and surrounding surface.
- Use rubbing alcohol or white vinegar to wipe down the old caulk. This removes soap scum, mildew, and oil.
- Scrub the cracked line gently with a toothbrush to dislodge any mold spores or grime.
- Dry the area completely with a cloth. Use a hairdryer to ensure that moisture has evaporated, especially in corners.
Pro Tip: Moisture is the #1 enemy of a strong caulking seal. Don’t skip the drying process.
Click page 2 for more