Gas burners are a key component of many kitchens worldwide. They’re efficient, effective, and versatile, allowing us to cook everything from a quick weekday meal to elaborate feasts. However, with frequent use, gas burners can become dirty, covered in grime, oil splashes, and food particles. These can result in the burners losing their aesthetic appeal and even impacting their performance. While many people resort to harsh cleaning products or expensive professional services, there is an easier, more cost-effective solution: a tablespoon of a household cleaner. In this article, we explore how a simple tablespoon of a cleaning solution can make gas burners shine again, with a step-by-step guide, tips, and tricks for maintaining these essential kitchen tools.
Why Gas Burners Get Dirty
Before diving into how to clean your burners effectively, it’s important to understand why they get dirty in the first place. Gas burners are exposed to food splatters, grease, water, and sometimes even burnt food during cooking. Over time, food residue, grease, and oil build up on the burners, reducing their performance and making them harder to clean.
The factors that contribute to the dirtiness of gas burners include:
- Grease Build-up: Cooking fatty foods, stir-fries, and oily dishes can lead to grease splattering across the burners.
- Spilled Liquids: Water, sauces, and other liquids can spill over onto the burners during cooking.
- Food Residue: Small bits of food can get caught on the burner surface, hardening and turning into stubborn stains.
- Burnt Oil and Carbon: Overheating cooking oils can burn and leave stubborn carbon marks on the burners.
- Heat and Moisture: A combination of heat and moisture from cooking can also cause residue to harden and stick to the surface.
How to Make Gas Burners Shine Again With 1 Tablespoon
Here’s where the power of a tablespoon comes in. With just a small amount of household ingredients and a little effort, you can restore your gas burners to their original shine. The best part? The cleaning solution is usually something you already have in your home.
Step-by-Step Cleaning Process:
- Gather Supplies:
- 1 tablespoon of baking soda
- 1 tablespoon of white vinegar
- Warm water
- A sponge or microfiber cloth
- A toothbrush (optional, for hard-to-reach areas)
- Dish soap (optional)
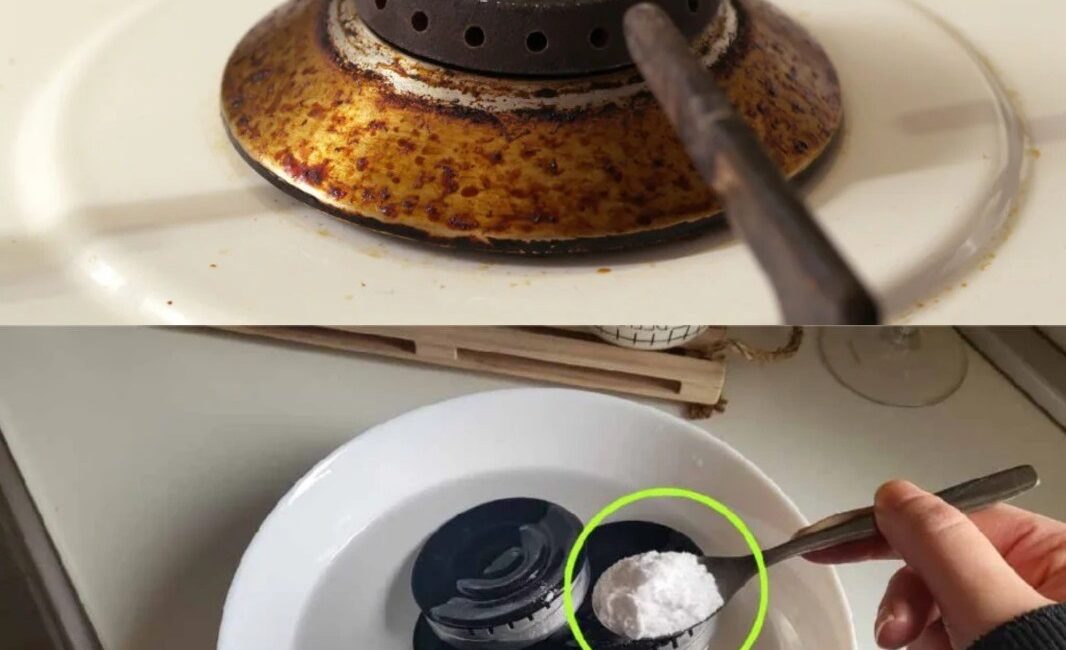
- Preparation: Before cleaning, make sure your gas burners are turned off and completely cool. Safety should always be a priority when dealing with kitchen appliances. Once cool, you can start removing the burner grates and other removable parts of the stove.
- Mix the Cleaning Solution: In a small bowl, mix 1 tablespoon of baking soda with 1 tablespoon of white vinegar. The reaction between the two ingredients creates a foamy paste that will help break down grease and food residue. Add a bit of warm water to dilute the mixture and create a paste-like consistency.
- Apply the Paste: Use a sponge or microfiber cloth to apply the paste to the dirty areas of the burners. If you have stubborn stains, press the paste onto the grime and let it sit for 10 to 15 minutes. The mixture will begin to dissolve the grease and food particles, making them easier to remove.
- Scrub Away Grime: After letting the paste sit for a while, gently scrub the burners with the sponge or a toothbrush (if necessary) to remove the build-up. Focus on the areas with the heaviest grease and food stains, using circular motions to lift the grime.
- Rinse and Dry: Once the burners are clean, rinse them with warm water to remove any leftover paste and grime. Be sure to dry the burners thoroughly with a clean towel to prevent water marks or rust.
- Reassemble the Burner: After the burner parts are dry, you can reassemble them. Place the grates and other components back in place on the stove, ensuring everything is securely fitted.
- Final Touch – Shine: For an extra shine, wipe down the burners with a microfiber cloth or a soft towel. This will remove any remaining residue and leave your burners gleaming.
Additional Tips for Maintaining Clean Gas Burners
While a tablespoon of baking soda and vinegar can work wonders for a deep clean, there are also other ways to maintain the cleanliness of your gas burners and keep them shining with minimal effort. Below are some additional tips for ongoing maintenance:
1. Clean Regularly:
To prevent heavy build-up, it’s important to clean your burners regularly. A quick wipe-down with a damp cloth after every use will help prevent grease and food particles from hardening into stains.
2. Use a Burner Protector:
Some stove owners opt to use burner protector mats or liners to keep their burners cleaner for longer. These mats can catch food drips and spills, preventing them from reaching the surface of the burners.
3. Use Gentle Cleaning Agents:
Harsh chemicals or abrasive sponges can scratch the surface of your burners, so it’s best to stick with natural cleaning products like baking soda, vinegar, or a mild dish soap solution.
4. Avoid Overheating Oils:
To avoid burnt-on food and carbon, try to avoid overheating cooking oils. Overheated oils are more likely to splatter and burn, leading to difficult-to-remove stains on your burners.
5. Clean Grates Separately:
If the grates of your gas burner are particularly dirty, consider removing them and soaking them in warm, soapy water. After soaking, scrub them with a brush or sponge to remove any residue. This can make cleaning the burners themselves easier.
Common Mistakes to Avoid When Cleaning Gas Burners
While cleaning your gas burners can be a simple task, there are a few mistakes to avoid to ensure you get the best results:
1. Using Abrasive Materials:
Avoid using steel wool pads or other abrasive sponges that can scratch and damage the surface of the burner. Stick to soft sponges or microfiber cloths.
2. Using Harsh Chemical Cleaners:
Harsh chemicals can not only damage your burners but may also leave behind unpleasant smells or residues that are difficult to remove. Stick to natural cleaners like baking soda, vinegar, or mild dish soap.
3. Not Drying Properly:
Leaving the burners wet can cause rusting or water spots to form, so always make sure to dry them thoroughly after cleaning.
4. Forgetting to Clean the Knobs:
The knobs on your stove can also collect grease and grime over time. Make sure to clean them along with the burners to maintain the overall cleanliness of your stove.
The Benefits of Cleaning Your Gas Burners Regularly
- Improved Performance: Clean gas burners will perform better, ensuring an even distribution of heat. If food or grease is clogging the burner, it can cause uneven flames or difficulty in maintaining heat, affecting your cooking.
- Longevity: Regular cleaning and maintenance can extend the life of your gas burners. By preventing the build-up of grease, carbon, and grime, you reduce the risk of damage and wear and tear over time.
- Aesthetic Appeal: Clean burners look more aesthetically pleasing, making your kitchen appear tidier and more organized. A shiny, well-maintained gas stove can enhance the overall look of your kitchen.
- Health and Safety: Cleaning your burners ensures that food particles and bacteria don’t accumulate, promoting a healthier cooking environment. Additionally, regular cleaning reduces the risk of fire hazards caused by grease build-up.
Conclusion
Gas burners are an essential part of the kitchen, and keeping them clean doesn’t have to be a tedious or expensive task. With just a tablespoon of baking soda and vinegar, you can restore your burners to their former shine, improving their performance and prolonging their life. Regular cleaning, combined with simple maintenance tips, ensures your gas burners stay in top condition, allowing you to enjoy efficient and safe cooking for years to come. So, next time you notice a buildup of grime or grease, remember that with a little bit of effort, you can have your gas burners gleaming once again!